The dust has settled after the much-hyped Microsoft PDC, where the future of Windows and .NET was announced and current progress was demonstrated. For developers, this means a whole new set of acronyms and technologies to become familiarized with, and, hopefully, a little excited about too. The purpose of this article is to give the ASP.NET developer a chance to prepare for what’s coming to .NET in the near future.
Whidbey: What is it?
Whidbey is the code name for the next generation .NET tools and technologies. Think of it as .NET 2.0. While still in Alpha release, Whidbey is already chock-full of additions, simplifications, and useful helpers.
While this article will concentrate on the biggest benefits introduced for the average ASP.NET developer, there’s more to Whidbey than I can cram into this short space. Those interested in further information should keep an eye on the official Website, ASP.NET as well as MSDN.
Master Pages
One of the biggest problems Web developers face is how to abstract the layout and appearance of a Web application. Custom base Web form classes and user controls introduced in ASP.NET certainly helped, in so far as allowing for custom UI elements and page types to be developed and integrated into pages. The placement and layout of page components, however, needs to be replicated across all an application’s pages, meaning a lot of manual alterations are required to rework the overall look of an application.
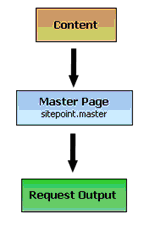
ASP.NET 2.0 introduces master pages, a straightforward and powerful mechanism for templating an application. As the developer, you can create a master page; that is, a page that defines the placement and appearance of elements comprising the pages in your application. Content pages then (as the name suggests) actually define the content and data to appear on the page. This information is then merged with the master page when a request is made, and a completed page is served up:
Where ASP.NET actually places your content is specified by you on your master page using content placeholders. Let’s look at a simple example that shows this in action.
Below is the code for a very simple master page:
<%@ Master Language="C#" %>

<html>

<body>

<asp:ContentPlaceholder id="textContent" runat="server">

</asp:ContentPlaceholder>

</body>

</html>
There are two items of interest here. First, we tell ASP.NET that this page is a master page through the attribute Master in the page directive. Second, we define a content placeholder, called textContent. Anyone who’s familiar with server controls will see that a content placeholder can be treated in just the same fashion as existing server controls.
In effect, a content placeholder is a region of the page that we can fill with content defined in a content page. We can link into the placeholder whatever controls we wish to include, and the completed page will inherit all the layout styles and markup defined in the master page. Below is a content page that adds a label control with the text “Hello World!” at the placeholder called textContent:
<%@ Page Language="C#" Master="~/sitepoint.master" %>

<script runat="server">

void Page_Load(object sender, System.EventArgs e)

{

   lblText.Text = "Hello World!";

}

</script>


<asp:Content id="Content1" ContentPlaceholderID="textContent" runat="server">

<asp:Label runat="server" id="lblText"></asp:Label>

</asp:Content>
To link the page to use the master page we defined earlier, we add the attribute Master to the page directive to identify the master page (saved in this example as sitepoint.master).
We then define the content we’d like to display inside the content placeholder on the master page. To do this, we use a new server control, content, and set its ContentPlaceholderID attribute to the ContentPlaceholder we wish to use. In the case of our example, the ContentPlaceholder in question is called textContent.
Among the events on the content page (like Page_Load), we then access the Label control we’ve defined to be added into the content placeholder just like any other control. Here, the Text property is set to “Hello World!”:
void Page_Load(object sender, System.EventArgs e)
{
lblText.Text = "Hello World!";
}The real beauty is that, if we wished to change the look of our pages now, all we'd need to do is to alter the master page; in effect, the layout has been abstracted from the content of the pages in our application.
Multiple Device Master Pages
ASP.NET 2.0 also allows you to define different master pages for different calling devices. If the visitor uses Mozilla to view your site, you can define a master page which will render correctly with Mozilla; ditto with Internet Explorer; ditto with a WAP browser. Finally, multi-device applications can be developed and centrally managed without any fuss.
Just as we linked a content page with a master page in the above example, we can also define master pages to use based on the calling device:
<%@ Page Language="C#"  Master="sitepoint.master"

    Mozilla:master="mozilla.master" %>
Depending on the requesting device, the appropriate master page is linked to the content page. This is particularly useful when writing client-side code that may not be cross-platform compatible, for example, some DHTML menus or JavaScripts.
Themeing
But the control ASP.NET 2.0 provides us over the creation of a uniform look and feel doesn’t stop there. Enter: themeing, or skinning, as it’s popularly known.
Using skins, you can dynamically alter the appearance of controls on your form using a skin file. A skin file can define both the default appearance of controls and the specialisations of those controls, much in the same way CSS works today. However, unlike CSS, themeing allows you to set values for any property of an ASP.NET server control, including data-binding properties, as long as they’re theme-aware.
Below is a skin file that sets both the default appearance of a Label and a specialisation of a label control. We can access this specialisation by setting the skinID attribute of a control appearing on the pages in our application to equal the ID of the specialisation.
<!--DEFAULT -->

<asp:Label runat="server"

    Font-Names="Arial" Font-Size="12pt"

    ForeColor="#ff0000" BackColor="transparent" />


<!--SPECIALISATION -->

<asp:Label runat="server" SkinID="Title"

    Font-Names="Arial" Font-Size="18pt"

    ForeColor="#0000ff" BackColor="transparent"

    Font-Bold="true" />
If we now specify that we wish to use this skin file in our code, all label controls will inherit their appearance from the default we’ve specified in the skin (that is, size 12 red Arial font). Yet if we set the skinID of a Label control on our form to equal our specialisation, named “Title”, the specialisation appearance will be used.
Let’s see how we can use this skin file. Below is the code for a form that uses the skin (saved in the directory Themes/MyTheme) to control the appearance of its controls:
<%@ Page Language="C#" Theme="MyTheme" %>

<asp:Label runat="Server" SkinID="Title"

    id="titleLabel" Text="This is a title!"/>

<p>

<asp:Label runat="Server"

    Text="This is the default text"/>

</p>
The first label inherits its look from our specialisation Title, whereas the second label inherits its look from the default defined in our skin file, and thus, does not require a skinID property.
Membership APIs
Almost all Web applications today, whether community- or ecommerce-based, require some kind of authentication for access. ASP.NET 1.x shipped with several means to simplify the task of building secure access into applications, with the most commonly implemented method being forms authentication. Developers could protect an application by requiring all access to be first channelled through a login form. After writing code to authenticate a user, access was granted and the user was redirected to their original request.
Even so, the process of building the database tables, managing the session cookies, writing code to add, remove and modify users and supply lost passwords is a drag. In steps ASP.NET 2.0, which comes complete with a comprehensive set of tools to build and manage access and membership to your applications.
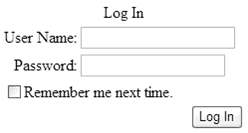
ASP.NET 2.0 introduces new controls to help build access control. The Login control is a one-stop solution for building a login form. The control comes complete with persistence support, meaning that the handy “Remember Me” functionality is handled for you. The LoginStatus control allows you to display the current login status to the user, and provides automatic links to “Log Out” and “Log In”. Similarly, the LoginName control allows quick display access to the username, and the LoginView control functions much like a traditional Panel; however, it allows you automatically to create different views for different login statuses. Finally, the PasswordRecovery control handles the all-too-familiar “Forgotten your Password?” functionality.
You’re provided with a Membership object that allows you to manage your membership. Data providers supply the links between your database and the controls and objects, and these can be defined in the web.config file. Two providers are ready of the box, with both SQL Server and Access (not surprisingly) being supported. However, other data providers can be implemented using a standard set of interfaces — no messy database coding required!
Let’s take an example. All that’s now required to provide access to a user is a Login control:
<html>
<body>
<form runat="server">
<asp:Login runat="server" />
</form>
</body>
</html>
When the user clicks on the "Log In" button, the event
Login_Clickis fired, and it's here that we can authenticate the user:
void Login_Click(Object Sender, EventArgs E) {

  if (Membership.ValidateUser(Username.Text, Password.Text))

  {

    FormsAuthentication.RedirectFromLoginPage(

      Username.Text, false);

  }

  else

  {

    LoginMessage.Text =

      "Wrong username or password. Please try again.";

  }

}
All the hard work is done for us. Membership.ValidateUser queries our database to see if the user exists, and, if so, we redirect the user to the page to which access was requested.
Personalisation
As you can see, this one comprehensive set of tools! But this is far from the point at which ASP.NET 2.0 leaves you to fend for yourself. In addition, it provides you with a Profile object.
The Profile object allows you to store information regarding the user in a simplified manner. A profile section can be added to the web.config file of an application, and different properties can be inserted to make up the profile of a user:
<profile>

  <property name="Name" type="System.String "/>

  <property name="Age" type="System.Integer "/>

</profile>
The properties can then be accessed in code via the Profile object:
Profile.Name = "Philip Miseldine";
Microsoft’s great use of IntelliSense means that all the properties you’ve added are popped up in the familiar automatic completion drop down when you develop using Visual Studio .NET.
You can also define groups in which to structure your profiles. For example, you could have a group called “PersonalInformation” full of properties about users’ personal details, and a group called “Responsibilities” full of properties defining users’ roles within an organisation:
<profile>

  <group name="PersonalInformation">

    <property name="Name" type="System.String "/>

    <property name="Age" type="System.Integer "/>

  </group>

  <group name="Responsibilities">

    <property name="AdminRights" type="System.Boolean"/>

  </group>

</profile>
In your code, these can now be accessed as:
Profile.PersonalInformation.Name = "Philip Miseldine";
As with the Membership API, profiles require a data provider to be specified in order to function. Profiles are then linked to the user when they log in, which facilitates the seamless and hassle-free handling of your site membership.
Working with the Membership API and the themeing functionality we discussed earlier, you can provide the user with the capability to fully customize the appearance of their experience of your site. Web Parts and Web Zones — familiar to anyone with experience of SharePoint — even allow you to automate portal development with information panels. Consequently, with ASP.NET 2.0, a developer can build highly customised and secured experiences for users with very little fuss.
Adaptive Device Rendering
The Mobile Internet Toolkit (MMIT) was a great, late addition to ASP.NET. Using adaptive rendering, the toolkit allowed the creation of pages that adapted their outputs according to the calling device. For example, a mobile phone accessing the page could be served a WML output; a PDA, an HTML 3.0 output; and so on. However, it was still necessary to segregate these pages as MobileWebForms, rather than standard WebForms, so a little more work was required to have truly adaptive Web pages.
ASP.NET 2.0 has adaptive rendering built into its core, meaning no more segregation. In addition, differing browsers can also be considered, so without any effort on your part, pages will be dished out as either WML, HTML or XHTML, according to which device is calling.
Pre-Compilation of Web Applications
One of the jarring behaviours of ASP.NET 1.x was that, once the Web application had been built, it still needed to be compiled. This exhibits itself as the short delay in displaying a page after a new assembly has been built and deployed. What was actually happening was that upon the first request for a page, the page code was compiled, and future requests used this compiled output.
In ASP.NET 2.0, an application (both the Web pages and the code) can be pre-compiled into assemblies, overcoming this problem. As an interesting side-effect, this also means better intellectual content control, as your site simply runs from a set of compiled assemblies, removing code and mark-up from your site’s storage. It also helps spot errors in code that’s not compiled to an assembly, for example, in-line code inside the .aspx page. As the whole site is compiled at your end, rather than on the server, the compiler will flag errors just as if you were using an IDE.
Visual Studio .NET “Whidbey”
Visual Studio .NET is a fantastic IDE for developing ASP.NET applications, but its Whidbey release is going to make it even smarter and easier to use. It’s the release I was hoping 2003 would be.
For Visual Basic developers, the much missed “Edit and Continue” will be implemented, meaning no full recompile is needed for each alteration made at runtime. Visual Basic is also being simplified, with an emphasis on returning it to a more visual development aspect. This means the IDE and language core will do far more of the tedious tasks automatically for you. This isn’t to everyone’s development tastes, but it does herald a return to the old Visual Basic without losing any of the big additions such as OO support, operator overloading and inline XML documentation.
C# developers are rewarded with a wide range of new language additions, including generics and iterators. A generic type can be used to produce code that stays the same while the data type of the parameters can change with each call. This can be achieved today by using polymorphism and type casting, yet generics let you avoid all the pitfalls and uncertainty of achieving this functionality as you’d code it today. Iterators allow for “types to declare how the foreach statement will iterate over their elements”. This means that no longer will a type need to implement GetEnumerator. Whilst the GetEnumerator is perfectly adequate for simple list structures, it cannot be used effectively on more complex structures, such as a binary tree.
Visual Studio .NET Whidbey provides far more additions, tweaks and improvements. IntelliSense is smarter, refactoring is supported, and debugging is more intelligent with automatic watches. IntelliTasks auto-completes often used code like switch and if...else statements. It even allows you to define your own blocks of code to auto-complete. Productivity will certainly be increased.
A Quick Word on Indigio
As well as building on the distributed Web Services framework already available to the ASP.NET developer, Whidbey also introduces Indigo, a new infrastructure that lets you build full systems from a set of services, rather than writing classes as in traditional OO development. Its biggest benefit is that Indigo allows rapid development of service systems that can be fully transacted with little code.
Summary
Well, there’s a brief overview of what ASP.NET developers can look forward to in the near future. And I haven’t even mentioned SQL Server’s successor Yukon, and the closer ties with Longhorn development. In a nutshell, Whidbey means less code to write, smarter development tools, and easier administration. Roll on, 2005!
 Philip Miseldine
Philip is a Computer Science PhD student at Liverpool John Moores University. He's still not mastered guitar tabs, never finished Mario, and needs a haircut.