An Introduction to Databases
A database server (in our case, MySQL) is a program that can store large amounts of information in an organized format that’s easily accessible through programming languages like PHP. For example, you could tell PHP to look in the database for a list of jokes that you’d like to appear on your web site. In this example, the jokes would be stored entirely in the database. The advantages of this approach would be twofold: First, instead of having to write an HTML page for each of your jokes, you could write a single PHP script that was designed to fetch any joke from the database and display it by generating an HTML page for it on the fly. Second, adding a joke to your web site would be a simple matter of inserting the joke into the database. The PHP code would take care of the rest, automatically displaying the new joke along with the others when it fetched the list from the database. Let’s run with this example as we look at how data is stored in a database. A database is composed of one or more tables, each of which contains a list of items, or things. For our joke database, we’d probably start with a table called joke that would contain a list of jokes. Each table in a database has one or more columns, or fields. Each column holds a certain piece of information about each item in the table. In our example, our joke table might have one column for the text of the jokes, and another for the dates on which the jokes were added to the database. Each joke stored in this way would then be said to be a row or entry in the table. These rows and columns form a table that looks like the figure below.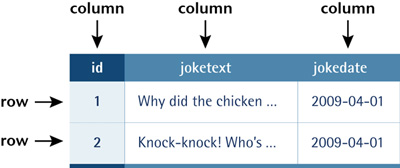 Notice that, in addition to columns for the joke text (
joketext) and the date of the joke (jokedate), I’ve included a column named id. As a matter of good design, a database table should always provide a means by which we can identify each of its rows uniquely. Since it’s possible that a single joke could be entered more than once on the same date, the joketext and jokedate columns can’t be relied upon to tell all the jokes apart. The function of the id column, therefore, is to assign a unique number to each joke so that we have an easy way to refer to them and to keep track of which joke is which. We’ll take a closer look at database design issues like this in Chapter 5, Relational Database Design.
So, to review, the table above is a three-column table with two rows, or entries. Each row in the table contains three fields, one for each column in the table: the joke’s ID, its text, and the date of the joke. With this basic terminology under your belt, you’re ready to dive into using MySQL.
Logging On to MySQL
Just as a web server is designed to respond to requests from a client (a web browser), the MySQL database server responds to requests from client programs. Later in this book, we’ll write our own MySQL client programs in the form of PHP scripts, but for now we can use some of the client programs that come included with the MySQL server.mysqladmin is an example of a MySQL client program. If you followed the instructions in Chapter 1, Installation, after setting up a MySQL server of your own, you used the mysqladmin client program to connect to the server, establish a password for the root user, and view basic statistics about the running server.
Another client program that comes with the MySQL server is called mysql. This program provides the most basic interface for working with a MySQL server, by establishing a connection to the server and then typing commands one at a time.
The mysql program can be found in the same place as mysqladmin, so if you followed the instructions in Chapter 1: Installation to add this location to your system path, you should be able to open a Terminal window (or Command Prompt if you’re using a Windows system) and type this command to run the mysql client program:
mysql --version
If everything is set up right, this command should output a one-line description of the version of the mysql client program that you’ve installed. Here’s what this looks like on my Mac:
mysql Ver 14.14 Distrib 5.1.31, for apple-darwin9.5.0 (i386) using readline 5.1
If instead you receive an error message complaining that your computer is unable to recognize the mysql command, you should probably revisit the installation instructions provided in Chapter 1: Installation. Once you’re able to run the mysqladmin commands in that chapter, the mysql command should work too. If you’re still stuck, drop by the SitePoint Forums and ask for some help.
Assuming the mysql program is running for you, you can now use it to connect to your MySQL server. First, make sure that server is running, then type this command and hit Enter:
mysql -u root -p
The -u root and -p parameters perform the same function for this program as they did for mysqladmin in Chapter 1: Installation. -u root tells the program you wish to connect to the server using the root user account, and -p tells it you’re going to provide a password.
What you should see next is an Enter password: prompt. Enter the root password you chose for yourself in Chapter 1, and hit Enter.
If you typed everything correctly, the MySQL client program will introduce itself and dump you on the MySQL command prompt:
Welcome to the MySQL monitor.  Commands end with ; or g.
Your MySQL connection id is 7
Server version: 5.1.31 MySQL Community Server (GPL)
Type ‘help;’ or ‘h’ for help. Type ‘c’ to clear the buffer.
mysql>
Let’s use a few simple commands to take a look around your MySQL server.
The MySQL server can actually keep track of more than one database. This allows a web host to set up a single MySQL server for use by several of its subscribers, for example. So, your first step after connecting to the server should be to choose a database with which to work. First, let’s retrieve a list of databases on the current server.
Connecting to a Remote MySQL Server
The instructions in this chapter assume you’re working with a MySQL server running on your own computer. Of course, when it comes time to publish your first PHP-and-MySQL-powered web site, you will need to know how to work with the MySQL server provided by your web host, or by your company’s IT department.
Technically, the mysql program we’re using in this chapter can connect to remote MySQL servers too. You just have to add an additional parameter when running it:
mysql -h hostname -u username -p
The -h hostname parameter (where hostname is the host name of the MySQL server to which you want to connect) tells the program to connect to a remote MySQL server instead of one running on the same computer. If you do this, you’ll probably also need to specify a username other than root, since the administrator responsible for the MySQL server will probably want to keep the root password secret for security reasons.
In practice, most remote MySQL servers will block connections from client programs running on untrusted computers like yours. Disallowing this type of connection is a common security measure for MySQL servers used in production.
To work with a remote MySQL server, you might be able to connect to a trusted computer and run the mysql program from there, but a far more common approach is to use a program called phpMyAdmin to manage your remote databases. phpMyAdmin is a sophisticated PHP script that lets you work with your MySQL databases using a web-based interface in your browser. phpMyAdmin connects to the remote MySQL server in the same way as the PHP scripts we’ll be writing later in this book.
I’ll show you how to install and use phpMyAdmin in Chapter 10, MySQL Administration. For now, let’s focus on learning to work with the MySQL server you’ve installed on your computer.
Type this command (including the semicolon!) and press Enter (As in Chapter 1: Installation, the mysql> prompt should already be visible on your screen; just type the command that comes after it):
mysql> SHOW DATABASES;
MySQL will show you a list of the databases on the server. If you’re working on a brand new server, the list should look like this:
+--------------------+
| Database           |
+--------------------+
| information_schema |
| mysql              |
| test               |
+--------------------+
3 rows in set (0.00 sec)
The MySQL server uses the first database, named information_schema, to keep track of all the other databases on the server. Unless you’re doing some very advanced stuff, you’ll probably leave this database alone.
The second database, mysql, is special too. MySQL uses it to keep track of users, their passwords, and what they’re allowed to do. We’ll steer clear of this for now, though we’ll revisit it in Chapter 10, MySQL Administration, when we discuss MySQL administration.
The third database, named test, is a sample database. You can actually delete this database because I’ll show you how to create your own database in a moment.
No test on WampServer
As of this writing, WampServer’s initial MySQL database has no test database in it. No need to be alarmed though; the developers of WampServer just thought it was as useless as I do, I guess!
Deleting stuff in MySQL is called “dropping” it, and the command for doing so is appropriately named:
mysql> DROP DATABASE test;
If you type this command and press Enter, MySQL will obediently delete the database, displaying “Query OK” in confirmation. Notice that there’s no confirmation prompt like “Are you sure?”. You have to be very careful to type your commands correctly in the mysql client program because, as this example shows, you can obliterate your entire database – along with all the information it contains – with a single command!
Before we go any further, let’s learn a couple of fundamentals about the MySQL command prompt. As you may have noticed, all commands in MySQL are terminated by a semicolon (;). If you forget the semicolon, MySQL will think you’re still typing your command, and will let you continue on another line:
mysql> SHOW
-> DATABASES;
MySQL shows that it’s waiting for you to type more of your command by changing the prompt from mysql> to ->. This handy feature allows you to spread long commands over several lines.
Case Sensitivity in SQL Queries
Most MySQL commands are not case-sensitive, which means you can type SHOW DATABASES, show databases, or ShOw DaTaBaSeS, and it will know what you mean. Database names and table names, however, are case-sensitive when the MySQL server is running on an operating system with a case-sensitive file system (like Linux or Mac OS X, depending on your system configuration).
Also, table, column, and other names must be spelled exactly the same when they’re used more than once in the same command.
For consistency, this book will respect the accepted convention of typing database commands in all capitals, and database entities (databases, tables, columns, and so on) in all lowercase.
If you’re halfway through a command and realize that you made a mistake early on, you may want to cancel the current command entirely and start over from scratch. To do this, type c and press Enter:
mysql> DROP DATABASEc
mysql>
MySQL will ignore the command you had begun to type and will return to the mysql> prompt to await another command.
Finally, if at any time you want to exit the MySQL client program, just type quit or exit (either will work). This is the only command where the semicolon is unnecessary, but you can use one if you want to.
mysql> quit
Bye
Now that we’ve successfully connected to our MySQL server it’s time to create our data.
Structured Query Language
The set of commands we’ll use to direct MySQL throughout the rest of this book is part of a standard called Structured Query Language, or SQL (pronounced as either “sequel” or “ess-cue-ell” – take your pick). Commands in SQL are also referred to as queries; I’ll use these two terms interchangeably. SQL is the standard language for interacting with most databases, so, even if you move from MySQL to a database like Microsoft SQL Server in the future, you’ll find that most of the commands are identical. It’s important that you understand the distinction between SQL and MySQL. MySQL is the database server software that you’re using. SQL is the language that you use to interact with that database. Learn SQL in Depth In this book, I’ll teach you the essentials of SQL that every PHP developer needs to know. If you decide to make a career out of building database driven web sites, you’ll find that it pays to know some of the more advanced details of SQL, especially when it comes to making your sites run as quickly and smoothly as possible. If you’d like to dive deeper into SQL, I highly recommend the book Simply SQL by Rudy Limeback (Melbourne: SitePoint, 2008).Creating a Database
When the time comes to deploy your first database driven web site on the Web, you’ll likely find that your web host or IT department has already created a MySQL database for you to use. Since you’re in charge of your own MySQL server, however, you’ll need to create your own database to use in developing your site. It’s just as easy to create a database as it is to delete one:mysql> CREATE DATABASE ijdb;
I chose to name the database ijdb, for Internet Joke Database (With a tip of the hat to the Internet Movie Database), because that fits with the example I gave at the beginning of this chapter – a web site that displays a database of jokes. Feel free to give the database any name you like, though.
Now that you have a database, you need to tell MySQL that you want to use it. Again, the command is easy to remember:
mysql> USE ijdb;
You’re now ready to use your database. Since a database is empty until you add some tables to it, our first order of business will be to create a table that will hold your jokes (now might be a good time to think of some!).
Creating a Table
The SQL commands we’ve encountered so far have been reasonably simple, but as tables are so flexible, it takes a more complicated command to create them. The basic form of the command is as follows:mysql> CREATE TABLE table_name (
-> column1Name column1Type column1Details,
-> column2Name column2Type column2Details,
-> ?
-> ) DEFAULT CHARACTER SET charset;
Let’s continue with the joke table I showed you in the previous figure. You’ll recall that it had three columns: id (a number), joketext (the text of the joke), and jokedate (the date on which the joke was entered). This is the command to create that table:
mysql> CREATE TABLE joke (
->   id INT NOT NULL AUTO_INCREMENT PRIMARY KEY,
->   joketext TEXT,
->   jokedate DATE NOT NULL
-> ) DEFAULT CHARACTER SET utf8;
Looks scary, huh? Let’s break it down:
CREATE TABLE joke (
This first line is fairly simple; it says that we want to create a new table named joke. The opening parenthesis (() marks the beginning of the list of columns in the table.
id INT NOT NULL AUTO_INCREMENT PRIMARY KEY,
This second line says that we want a column called id that will contain an integer (INT), that is, a whole number. The rest of this line deals with special details for the column:
- First, when creating a row in this table, this column is not allowed to be left blank (
NOT NULL). - Next, if we omit specifying a particular value for this column when we add a new entry to the table, we want MySQL to automatically pick a value that is one more than the highest value in the table so far (
AUTO_INCREMENT). - Finally, this column is to act as a unique identifier for the entries in the table, so all values in this column must be unique (
PRIMARY KEY).
joketext TEXT,
This third line is super simple; it says that we want a column called joketext, which will contain text (TEXT).
jokedate DATA NOT NULL
This fourth line defines our last column, called jokedate; this will contain a date (DATE), which cannot be left blank (NOT NULL).
) DEFAULT CHARACTER SET utf8;
The closing parenthesis ()) marks the end of the list of columns in the table.
DEFAULT CHARACTER SET utf8 tells MySQL that you will be storing UTF-8 encoded text in this table. UTF-8 is the most common encoding used for web content, so you should use it in all your database tables that you intend to use on the Web.
Finally, the semicolon tells the mysql client program that you’ve finished typing your query.
Note that we assigned a specific data type to each column we created. id will contain integers, joketext will contain text, and jokedate will contain dates. MySQL requires you to specify in advance a data type for each column. This helps to keep your data organized, and allows you to compare the values within a column in powerful ways, as we’ll see later. For a complete list of supported MySQL data types, see Appendix C, MySQL Column Types.
Now, if you typed the above command correctly, MySQL will respond with “Query OK”, and your first table will be created. If you made a typing mistake, MySQL will tell you there was a problem with the query you typed, and will try to indicate where it had trouble understanding what you meant.
For such a complicated command, “Query OK” is a fairly underwhelming response. Let’s have a look at your new table to make sure it was created properly. Type the following command:
mysql> SHOW TABLES;
The response should look like this:
+----------------+
| Tables_in_ijdb |
+----------------+
| joke           |
+----------------+
1 row in set (0.02 sec)
This is a list of all the tables in your database (which we named ijdb above). The list contains only one table: the joke table you just created. So far, everything seems fine. Let’s take a closer look at the joke table itself using a DESCRIBE query:
mysql> DESCRIBE joke;
+----------+---------+------+-----+---------+----------------+
| Field    | Type    | Null | Key | Default | Extra          |
+----------+---------+------+-----+---------+----------------+
| id       | int(11) | NO   | PRI | NULL    | auto_increment |
| joketext | text    | YES  |     | NULL    |                |
| jokedate | date    | NO   |     | NULL    |                |
+----------+---------+------+-----+---------+----------------+
3 rows in set (0.10 sec)
As you can see, there are three columns (or fields) in this table, which appear as the three rows in this table of results. The details are a little cryptic, but if you look at them closely, you should be able to figure out what they mean. It’s nothing to be too worried about, though. You have better things to do, like adding some jokes to your table!
We need to look at just one more task before you get to that, though: deleting a table. This task is as frighteningly easy as deleting a database. In fact, the command is almost identical. Don’t run this command with your joke table, unless you actually do want to be rid of it!
mysql> DROP TABLE tableName;
Inserting Data into a Table
Your database is created and your table is built; all that’s left is to put some actual jokes into the database. The command that inserts data into a database is called, appropriately enough,INSERT. This command can take two basic forms:
mysql> INSERT INTO tableName SET
->   column1Name = column1Value,
->   column2Name = column2Value,
->   ?
-> ;

mysql> INSERT INTO tableName
->   (column1Name, column2Name, ...)
->   VALUES (column1Value, column2Value, ...);
So, to add a joke to our table, we can use either of these commands:
mysql> INSERT INTO joke SET
-> joketext = "Why did the chicken cross the road? To get to
">  the other side!",
-> jokedate = "2009-04-01";

mysql> INSERT INTO joke
-> (joketext, jokedate) VALUES (
-> "Why did the chicken cross the road? To get to the other
">  side!",
-> "2009-04-01"
-> );
Note that in both forms of the INSERT command, the order in which you list the columns must match the order in which you list the values. Otherwise, the order of the columns is unimportant.
As you typed this query, you’ll have noticed that we used double quotes (") to mark where the text of the joke started and ended. A piece of text enclosed in quotes this way is called a text string, and this is how you represent most data values in SQL. You’ll notice, for instance, that the dates are typed as text strings as well, in the form “YYYY-MM-DD“.
If you prefer, you can type text strings surrounded with single quotes (') instead of double quotes:
mysql> INSERT INTO joke SET
-> joketext = ‘Why did the chicken cross the road? To get to
‘> the other side!’,
-> jokedate = ‘2009-04-01’;
You might be wondering what happens when the text of a joke itself contains quotes. Well, if the text contains single quotes, the easiest thing to do is surround it with double quotes. Conversely, if the text contains double quotes, surround it with single quotes.
If the text you want to include in your query contains both single and double quotes, you’ll have to escape the conflicting characters within your text string. You escape a character in SQL by adding a backslash (INSERT command for a joke containing both single and double quotes:
mysql> INSERT INTO joke
-> (joketext, jokedate) VALUES (
-> 'Knock-knock! Who's there? Boo! "Boo" who?
'>  Don't cry; it's only a joke!',
-> "2009-04-01");
As you can see, I’ve marked the start and end of the text string for the joke text using single quotes. I’ve therefore had to escape the three single quotes within the string by putting backslashes before them. MySQL sees these backslashes and knows to treat the single quotes as characters within the string, rather than end-of-string markers.
If you’re especially clever, you might now be wondering how to include actual backslashes in SQL text strings. The answer is to type a double-backslash (\), which MySQL will see and treat as a single backslash in the string of text.
Now that you know how to add entries to a table, let’s see how we can view those entries.
Viewing Stored Data
The command we use to view data stored in database tables,SELECT, is the most complicated command in the SQL language. The reason for this complexity is that the chief strength of a database is its flexibility in data retrieval. At this early point in our experience with databases we need only fairly simple lists of results, so we’ll just consider the simpler forms of the SELECT command here.
This command will list everything that’s stored in the joke table:
mysql> SELECT * FROM joke;
Read aloud, this command says “select everything from joke.” If you try this command, your results will resemble the following:
+----+--------------------------------------------------------------
-+------------+
| id | joketext
| jokedate   |
+----+--------------------------------------------------------------
-+------------+
|  1 | Why did the chicken cross the road? To get to the other side!
| 2009-04-01 |
+----+--------------------------------------------------------------
-+------------+
1 row in set (0.00 sec)
The results look a little disorganized because the text in the joketext column is so long that the table is too wide to fit on the screen properly. For this reason, you might want to tell MySQL to leave out the joketext column. The command for doing this is as follows:
mysql> SELECT id, jokedate FROM joke;
This time, instead of telling it to “select everything,” we told it precisely which columns we wanted to see. The results look like this:
+----+------------+
| id | jokedate   |
+----+------------+
|  1 | 2009-04-01 |
+----+------------+
1 row in set (0.00 sec)
That’s okay, but we’d like to see at least some of the joke text? As well as being able to name specific columns that we want the SELECT command to show us, we can use functions to modify each column’s display. One function, called LEFT, lets us tell MySQL to display a column’s contents up to a specified maximum number of characters. For example, let’s say we wanted to see only the first 20 characters of the joketext column. Here’s the command we’d use:
mysql> SELECT id, LEFT(joketext, 20), jokedate FROM joke;
+----+----------------------+------------+
| id | LEFT(joketext, 20)   | jokedate   |
+----+----------------------+------------+
|  1 | Why did the chicken  | 2009-04-01 |
+----+----------------------+------------+
1 row in set (0.00 sec)
See how that worked? Another useful function is COUNT, which lets us count the number of results returned. If, for example, you wanted to find out how many jokes were stored in your table, you could use the following command:
mysql> SELECT COUNT(*) FROM joke;
+----------+
| COUNT(*) |
+----------+
|        1 |
+----------+
1 row in set (0.02 sec)
As you can see, you have just one joke in your table.
So far, all the examples have fetched all the entries in the table; however, you can limit your results to include only those database entries that have the specific attributes you want. You set these restrictions by adding what’s called a WHERE clause to the SELECT command. Consider this example:
mysql> SELECT COUNT(*) FROM joke WHERE jokedate >= "2009-01-01";
This query will count the number of jokes that have dates greater than or equal to January 1, 2009. In the case of dates, “greater than or equal to” means “on or after.” Another variation on this theme lets you search for entries that contain a certain piece of text. Check out this query:
mysql> SELECT joketext FROM joke WHERE joketext LIKE "%chicken%";
This query displays the full text of all jokes that contain the text “chicken” in their joketext column. The LIKE keyword tells MySQL that the named column must match the given pattern. In this case, the pattern we’ve used is “%chicken%“. The % signs indicate that the text “chicken” may be preceded and/or followed by any string of text.
Additional conditions may also be combined in the WHERE clause to further restrict results. For example, to display knock-knock jokes from April 2009 only, you could use the following query:
mysql> SELECT joketext FROM joke WHERE
-> joketext LIKE "%knock%" AND
-> jokedate >= "2009-04-01" AND
-> jokedate < "2009-05-01";
Enter a few more jokes into the table and experiment with SELECT queries. A good familiarity with the SELECT command will come in handy later in this book.
You can do a lot with the SELECT command. We’ll look at some of its more advanced features later, when we need them.
Modifying Stored Data
Having entered your data into a database table, you might like to change it. Whether you want to correct a spelling mistake, or change the date attached to a joke, such alterations are made using theUPDATE command. This command contains elements of the SELECT and INSERT commands, since the command both picks out entries for modification and sets column values. The general form of the UPDATE command is as follows:
mysql> UPDATE tableName SET
->   colName = newValue, ...
-> WHERE conditions;
So, for example, if we wanted to change the date on the joke we entered above, we’d use the following command:
mysql> UPDATE joke SET jokedate = "2010-04-01" WHERE id = "1";
Here’s where that id column comes in handy: it enables you to single out a joke for changes easily. The WHERE clause used here works just as it did in the SELECT command. This next command, for example, changes the date of all entries that contain the word “chicken”:
mysql> UPDATE joke SET jokedate = "2010-04-01"
-> WHERE joketext LIKE "%chicken%";
Deleting Stored Data
Deleting entries in SQL is dangerously easy, which, if you’ve yet to notice, is a recurring theme. Here’s the command syntax:mysql> DELETE FROM tableName WHERE conditions;
To delete all chicken jokes from your table, you’d use the following query:
mysql> DELETE FROM joke WHERE joketext LIKE "%chicken%";
Careful With That Enter Key!
Believe it or not, the WHERE clause in the DELETE command is actually optional.
Consequently, you should be very careful when typing this command! If you leave the WHERE clause out, the DELETE command will then apply to all entries in the table.
This command will empty the joke table in one fell swoop:
mysql> DELETE FROM joke;
Scary, huh?
Let PHP Do the Typing
There’s a lot more to the MySQL database server software and SQL than the handful of basic commands I’ve presented here, but these commands are by far the most commonly used. At this stage, you might be thinking that databases seem a little cumbersome. SQL can be fairly tricky to type – its commands tend to be rather long and verbose compared to other computer languages. You’re probably already dreading the thought of typing in a complete library of jokes in the form ofINSERT commands.
Don’t sweat it! As we proceed through this book, you’ll be surprised at how few SQL queries you actually type by hand. Generally, you’ll be writing PHP scripts that type your SQL for you. If you want to be able to insert a bunch of jokes into your database, for example, you’ll typically create a PHP script for adding jokes that includes the necessary INSERT query, with a placeholder for the joke text. You can then run that PHP script whenever you have jokes to add. The PHP script prompts you to enter your joke, then issues the appropriate INSERT query to your MySQL server.
For now, however, it’s important for you to gain a good feel for typing SQL by hand. It will give you a strong sense of the inner workings of MySQL databases, and will make you appreciate the work that PHP will save you all the more!
To date, we’ve only worked with a single table, but to realize the true power of a relational database, you’ll also need to learn how to use multiple tables together to represent potentially complex relationships between the items stored in your database. I’ll cover all this and more in Chapter 5, Relational Database Design, in which I’ll discuss database design principles and show off some more advanced examples.
For now, though, we’ve accomplished our objective, and you can comfortably interact with MySQL using the mysql client program. In Chapter 3: Introducing PHP, the fun continues as we delve into the PHP language, and use it to create several dynamically-generated web pages.
If you like, you can practice with MySQL a little before you move on by creating a decent-sized joke table. This knowledge will come in handy later on in Chapter 4: Publishing MySQL Data on the Web.
Frequently Asked Questions (FAQs) about Getting Started with MySQL
How can I install MySQL on my computer?
Installing MySQL on your computer is a straightforward process. For Windows users, you can download the MySQL installer from the official MySQL website. Once downloaded, run the installer and follow the on-screen instructions. For Mac users, you can use Homebrew to install MySQL. Open Terminal and type in “brew install mysql”. After installation, you can start the MySQL server using the command “mysql.server start”.
What is the purpose of PHPMyAdmin in MySQL?
PHPMyAdmin is a free software tool written in PHP, intended to handle the administration of MySQL over the Web. It provides a convenient visual interface for managing your databases, tables, and data. You can perform various tasks such as running SQL queries, optimizing and repairing tables, and managing users and permissions.
How can I connect to a MySQL database using PHP?
To connect to a MySQL database using PHP, you can use the mysqli_connect() function. This function takes four parameters: the hostname of your MySQL server, the username, the password, and the database name. If the connection is successful, it returns a MySQL link identifier that you can use for subsequent MySQL operations.
How can I handle errors in MySQL?
MySQL provides several ways to handle errors. One common method is to use the die() function in PHP. This function will stop the script and print a message if there is an error. Another method is to use the mysqli_error() function, which returns a string description of the last error.
How can I search for specific data in a MySQL database?
You can search for specific data in a MySQL database using the SQL SELECT statement. This statement allows you to specify the columns you want to retrieve and the conditions that the data must meet. For example, to find all records with a certain value in a certain column, you can use a query like “SELECT * FROM table WHERE column = value”.
How can I update data in a MySQL database?
To update data in a MySQL database, you can use the SQL UPDATE statement. This statement allows you to modify the values of one or more columns in one or more rows. The syntax is “UPDATE table SET column1 = value1, column2 = value2 WHERE condition”.
How can I delete data from a MySQL database?
To delete data from a MySQL database, you can use the SQL DELETE statement. This statement removes one or more rows from a table. The syntax is “DELETE FROM table WHERE condition”. Be careful when using this statement, as it permanently removes data.
How can I optimize a MySQL database?
MySQL provides several tools for optimizing databases. One of these is the OPTIMIZE TABLE statement, which reorganizes the physical storage of table data and associated index data to reduce storage space and improve I/O efficiency.
How can I backup a MySQL database?
To backup a MySQL database, you can use the mysqldump utility. This utility creates a text file with a series of SQL statements that can be used to recreate the database. The syntax is “mysqldump -u username -p database > backup.sql”.
How can I restore a MySQL database from a backup?
To restore a MySQL database from a backup, you can use the mysql utility. This utility executes the SQL statements in a text file. The syntax is “mysql -u username -p database < backup.sql”.
 Kevin Yank
Kevin Yank is an accomplished web developer, speaker, trainer and author of Build Your Own Database Driven Website Using PHP & MySQL and Co-Author of Simply JavaScript and Everything You Know About CSS is Wrong! Kevin loves to share his wealth of knowledge and it didn't stop at books, he's also the course instructor to 3 online courses in web development. Currently Kevin is the Director of Front End Engineering at Culture Amp.