- What is A-Frame?
- Device Compatibility
- What You’ll Need
- Getting Started
- Running Our Local Server
- Building a New Scene
- Setting Up Our Sky
- Adding a Box
- Adding Some Cylinders
- Adding a sphere
- Adding Textures Using Assets
- In VR
- Try It In Action
- Conclusion
- Frequently Asked Questions (FAQs) about A-Frame and VR Web Development
Web developers around the world don’t need to go out and learn entirely new languages or a game engine like Unity or Unreal Engine to start developing virtual reality. There are various ways to start experimenting with VR on the web today and the A-Frame framework is one of the easiest ways to get started.
What is A-Frame?
A-Frame is an open source framework for creating WebVR experiences using custom HTML elements. These elements use three.js and WebGL to create VR-enabled elements in a scene, without requiring developers to learn lower level APIs such as WebGL in order to build simple experiences for VR.
The A-Frame team are striving to create an extensible VR web that allows developers to build competing APIs and ideas which, once widely adopted and established, can become part of a defined standard. This allows us to use new capabilities today via JavaScript frameworks and experimental browser builds, without needing to wait for a standard to be implemented and make its way into the browser.
Device Compatibility
The next — and very important — question most likely to be asked next would be “is A-Frame cross-browser compatible?”. Surprisingly, A-Frame experiences work well on a variety of platforms, with the 3D scene (without VR) being visible as a fallback as long as the browser is WebGL compatible. This means Chrome, Firefox, Edge and Opera all show an interactive 3D version of the experience for the desktop. For a VR experience, an Oculus Rift can be connected to WebVR enabled versions of some browsers to bring in VR compatibility (see links below under “What You’ll Need”).
In terms of smartphones, modern smartphones within the last two generations that run iOS and Android are best (iPhone 6 and up, Samsung Galaxy S6 and up, my HTC One M9 works well). Most of these also support virtual reality when inserted into a Google Cardboard headset, so VR-compatibility can actually be higher and easier to manage than trying to get VR working on your desktop!
What You’ll Need
To follow along and try out A-Frame yourself, you will need the following:
- For a basic non-VR experience — A WebGL enabled browser as mentioned above.
- For a desktop VR experience —
- A browser build with WebVR support such as the latest Chromium WebVR build or Firefox Nightly.
- An Oculus Rift headset (maybe the HTC Vive too, I haven’t been able to test this!).
- For a mobile VR experience —
- Most modern smartphones will be capable of at least showing the scene and allowing you to look around in a semi-VR view (one without the headset itself but where moving the phone moves your view around).
- A Google Cardboard or Gear VR headset.
Getting Started
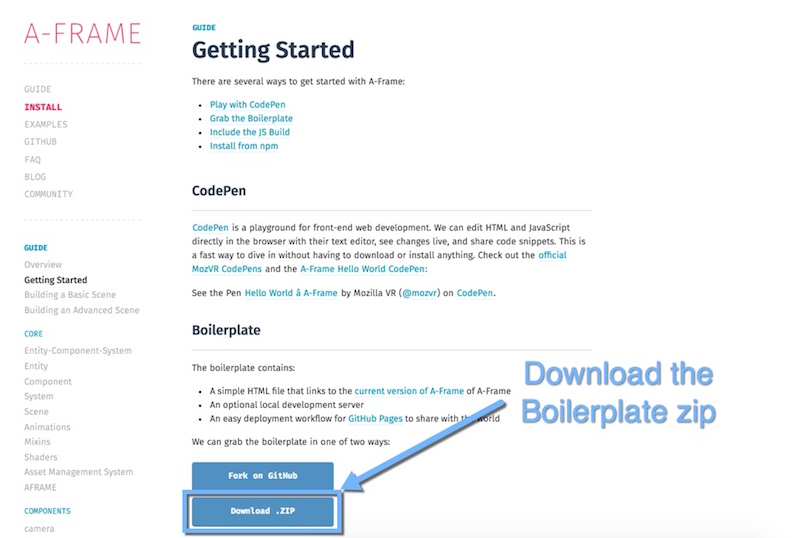
To get started, head to A-Frame’s Getting Started page. The A-Frame team have provided various options for experimenting with A-Frame, including CodePen snippets, an npm build, a downloadable or CDN available JS file of the framework, and a boilerplate with HTML and a local dev server as a guide to best practice. To keep things as simple as possible, we will be downloading and working directly from the A-Frame boilerplate.
Extract the boilerplate wherever you prefer to have web projects on your system. It does not necessarily need to be running on a local web server. The boilerplate uses A-Frame from their CDN, so it is mainly the index.html file that we are after. The package.json provides an npm based local web server for testing, we will use this in this article — however, it is not necessary to test this out.
Running Our Local Server
As mentioned above, the A-Frame Boilerplate comes with its own local web server ready for use. While this isn’t always necessary in order to test your A-Frame scenes, it is good practice to do so and can reduce confusion when it comes to various cross-origin policy issues that often arise when it comes to running webpages via the file system on your computer.
To run the local web server, go to the folder with your boilerplate project inside your Terminal/Command Prompt and run the following:
npm install && npm startThis will install all the necessary files for the web server and then run it for you. After this point, if you ever want to run the server again, just run npm start.
Upon running the local web server, it should automatically open up our web browser and load our boilerplate webpage. It comes with LiveReload — which means that it will automatically refresh whenever you make changes.
If you need to open the webpage on a different device, or if it does not open automatically after you’ve run the local web server, you can open it by going to http://localhost:3000 in your browser or http://192.168.0.1:3000, where that IP address is the IP address of your computer.
The initial scene you should see looks like so:

Building a New Scene
Let’s clean up the boilerplate code and remove everything within the <body> tag apart from <a-scene>. All of our A-Frame elements will be placed within this <a-scene> component:
<!DOCTYPE html>
<html>
  <head>
    <meta charset="utf-8"/>
    <title>Our First A-Frame Experience</title>
    <script src="https://aframe.io/releases/0.2.0/aframe.min.js"></script>
  </head>
  <body>
    <a-scene>

    </a-scene>
  </body>
</html>
A-Frame comes with a set of primitives which provide us a series of commonly used elements for VR scenes. Let’s add a few of our own to build up a custom scene.
Setting Up Our Sky
Every scene needs a sky (or background of some kind). This can be either a flat color, or a panoramic, equirectangular image. The primitive for this is <a-sky>.
The code for a sky with a single, flat color looks like so:
<a-scene>
  <a-sky color="#C500FF"></a-sky>
</a-scene>
That creates a lovely and natural bright fuchsia sky for our scene:

As glorious as that sky is, it will look better with a panoramic 360 image. One nice spot to find skyboxes you can use to experiment is Flickr. There are a range of equirectangular photos here that are provided with a licence that will allow you to reuse them.
I went onto Flickr and found the following photo from Luca Biada which does require attribution in order to be used in a project (always check the licence terms!):
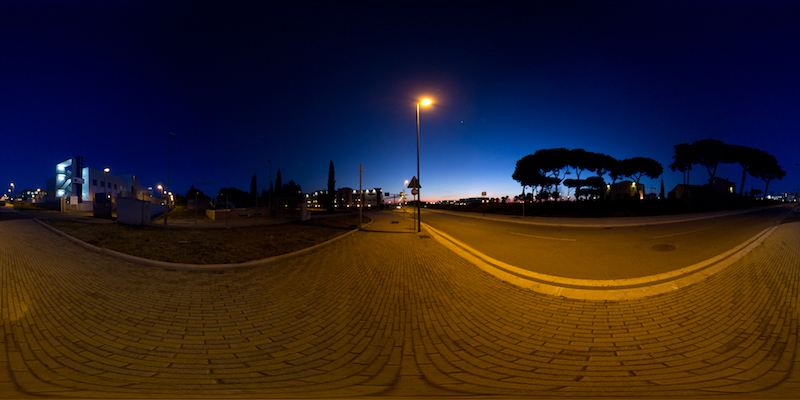
When we place this into our scene using the following code:
<a-scene>
  <a-sky src="street.jpg"></a-sky>
</a-scene>
We get a 360 background of that scene:

Adding a Box
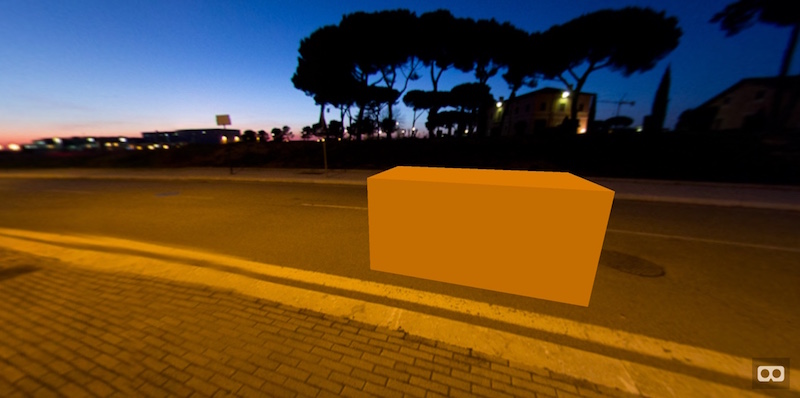
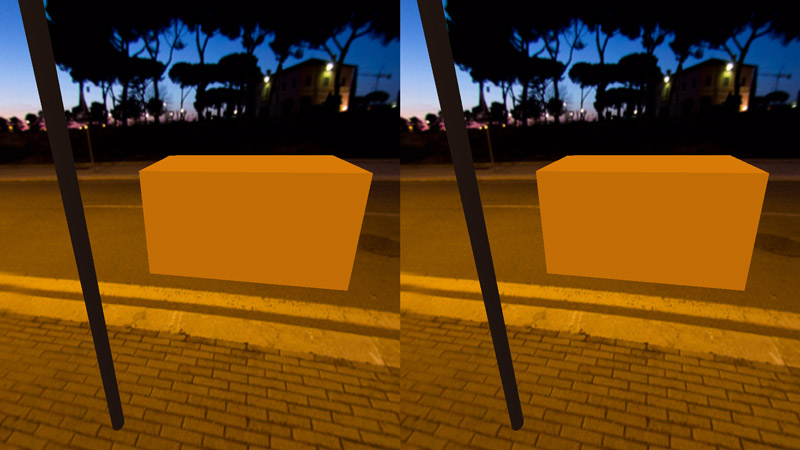
Now we have a scene, lets add some elements into it. Using the <a-box> primitive, we can place cubes and boxes into our scene. The following code adds an orange box onto the road in our scene:
<a-box color="#B76705" depth="2" height="2" width="4" position="0 0 -1.25"></a-box>The color attribute works the same way as our skybox, setting up the texture color for our box element. We then have attributes for depth, height and width which give it its shape. Our box is 2 x 2 x 4, which makes it a wide box which will look vaguely like a box car when placed on the road. To place it in different positions in the scene, we can move its position using the position attribute. That attribute takes three values, one for each axis: x y z.
Our box with the code above, looks like so in our scene:
Adding Some Cylinders
Now we will add some extra street poles into the scene using the cylinder primitive — <a-cylinder>:
<a-cylinder color="#1E130E" height="40" radius="0.5" position="-40 0 -8"></a-cylinder>The color and position attributes work in the same way as our box, however we have two new attributes — height and radius which set the height and radius respectively for our cylinder. Here’s our scene with a subtle new pole:

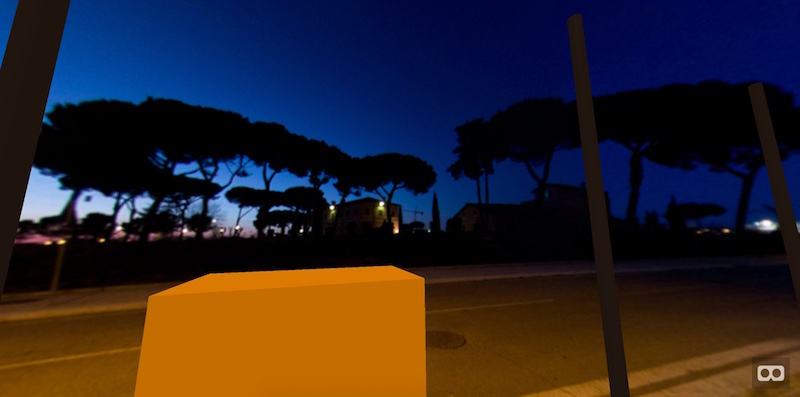
It is incredibly easy to scale this idea, so with the following code, we can add a whole row of poles:
<a-cylinder color="#1E130E" height="40" radius="0.5" position="-40 0 -8"></a-cylinder>
<a-cylinder color="#1E130E" height="40" radius="0.5" position="-10 0 -8"></a-cylinder>
<a-cylinder color="#1E130E" height="40" radius="0.5" position="20 0 -8"></a-cylinder>
<a-cylinder color="#1E130E" height="40" radius="0.5" position="50 0 -7"></a-cylinder>
Which looks like so:
Cylinders actually have a whole range of other options in A-Frame, feel free to explore those options in their Cylinder docs.
Adding a sphere
Another pretty common shape to include in a 3D space is a sphere. We can create spheres using the <a-sphere> primitive like so:
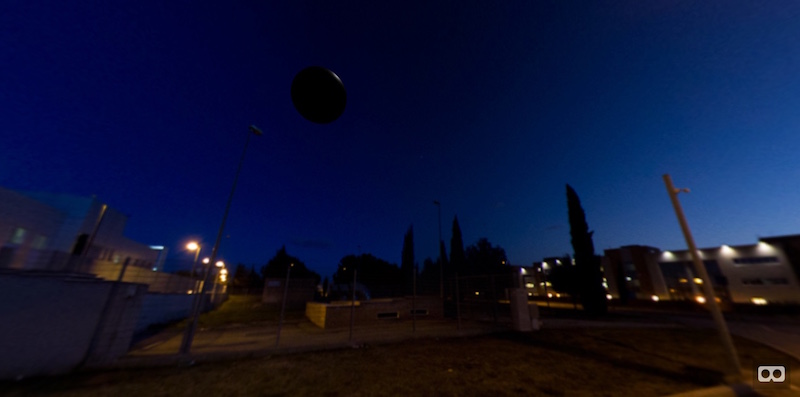
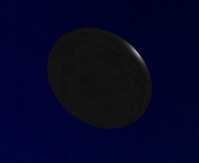
<a-sphere color="#000000" radius="2" position="0 15 20"></a-sphere>That code is pretty straight forward and creates a creepy black sphere floating in the sky behind us:
Adding Textures Using Assets
We can add textures to our primitives like the box, cylinder and sphere via the <a-assets> tag. This sets up the A-Frame asset management system, which gives us the ability to define assets and then use them on our shapes. This is the recommended way to texture your scene.
I downloaded and adjusted a simple (but very cool) repeating pattern by Carlos Aguilar from Subtle Patterns. We can add that asset into our scene like so:
<a-assets>
  <img id="darktexture" src="blacktexture.png">
</a-assets>
The id gives us a name to use when referring to our texture and using it on objects in our scene. The src attribute tells A-Frame which image we want. To give an object in our scene that texture, we can include the texture within the object’s src attribute, using a hash before the texture’s ID:
<a-sphere src="#darktexture" radius="2" position="0 15 20"></a-sphere>That gives our random, spooky sphere in the sky a nicer and rather sci-fi looking texture:
In VR
To see these experiences in VR, you will either need an Oculus Rift connected to your PC or you will need a modern smartphone! The smartphone option is the easiest for most. If you don’t have a VR headset, when you go to the scene on your smartphone you will still see everything and can look around by moving your phone about:

If you have a Google Cardboard headset to use with your phone, you can click the VR icon on the bottom right corner to enter VR view:
Try It In Action
If you’d like to have a go at the A-Frame street demo we put together in this tutorial, you can see it right here — A-Frame Street Demo.
Conclusion
When it comes to WebVR, A-Frame is an incredibly simple and easy to use framework to put together VR experiences that are relatively cross-browser compatible. There is a whole lot more that can be done with A-Frame and I can’t wait to explore more of it in future articles here at SitePoint.
If you are a fan of WebVR, we covered how to build virtual reality in VR with Primrose and WebVR last week, definitely check that out! Primrose is another exciting WebVR framework aimed at productivity applications. Elio Qoshi also wrote about the recent WebVR 1.0 API Draft Proposal here at SitePoint which is worth a read if you are working with WebVR.
If you’ve used A-Frame for your own VR web experience, I’d love to see what you put together! Let me know in the comments below, or get in touch with me on Twitter at @thatpatrickguy.
Frequently Asked Questions (FAQs) about A-Frame and VR Web Development
What are the main differences between A-Frame and other VR development platforms like Unity or Unreal?
A-Frame is a web-based VR development platform, which means it allows developers to create VR experiences that can be accessed directly from a web browser without the need for any additional software or hardware. This is a significant advantage over platforms like Unity or Unreal, which require users to download and install specific software to experience VR content. A-Frame also uses HTML-like syntax, making it more accessible to developers with a background in web development.
How can I start developing with A-Frame?
To start developing with A-Frame, you need to include the A-Frame library in your HTML file. You can do this by adding a script tag with the source set to the A-Frame CDN. Once the library is included, you can start creating VR scenes using A-Frame’s HTML-like syntax. You can also use A-Frame’s visual inspector to view and edit your scene in 3D.
What kind of experiences can I create with A-Frame?
A-Frame allows you to create a wide range of VR experiences, from simple 360-degree panoramas to complex interactive games. You can create 3D models, add animations, and even integrate with other web APIs to create truly immersive experiences. A-Frame also supports WebVR, which means your experiences can be accessed on any VR headset that supports this standard.
Can I use A-Frame with other web development libraries or frameworks?
Yes, A-Frame can be used alongside other web development libraries and frameworks. For example, you can use A-Frame with React to create VR experiences that take advantage of React’s state management and component-based architecture. You can also use A-Frame with Three.js to create more complex 3D graphics.
How can I optimize my A-Frame project for performance?
There are several ways to optimize your A-Frame project for performance. One of the most effective methods is to reduce the number of draw calls by merging geometries and using instancing. You can also optimize your textures and materials, and use LOD (Level of Detail) models to reduce the complexity of your 3D models at further distances.
Can I use A-Frame to create AR (Augmented Reality) experiences?
While A-Frame is primarily designed for VR, it can also be used to create AR experiences. This is possible thanks to the WebXR API, which supports both VR and AR. However, creating AR experiences with A-Frame may require a bit more work compared to VR, as you’ll need to handle things like camera input and object placement in the real world.
How can I debug my A-Frame project?
A-Frame includes a visual inspector that allows you to view and edit your scene in 3D. You can open the inspector by pressing Ctrl + Alt + I on your keyboard. The inspector allows you to move objects around, change their properties, and even export your changes back to your HTML file.
Can I use A-Frame on mobile devices?
Yes, A-Frame supports mobile devices. Users can view your A-Frame project in a mobile web browser, or they can use a mobile VR headset like Google Cardboard. A-Frame also supports touch and gyroscopic input, allowing users to interact with your project using their mobile device.
What is the A-Frame Registry?
The A-Frame Registry is a collection of community-made A-Frame components that you can use in your own projects. These components extend the functionality of A-Frame, allowing you to do things like integrate with third-party APIs, add physics to your scene, or create complex animations.
How can I contribute to the A-Frame community?
There are many ways to contribute to the A-Frame community. You can create and share your own A-Frame components, contribute to the A-Frame GitHub repository, or participate in discussions on the A-Frame Slack channel or subreddit. The A-Frame community is very welcoming and always looking for new contributors.
 Patrick Catanzariti
PatCat is the founder of Dev Diner, a site that explores developing for emerging tech such as virtual and augmented reality, the Internet of Things, artificial intelligence and wearables. He is a SitePoint contributing editor for emerging tech, an instructor at SitePoint Premium and O'Reilly, a Meta Pioneer and freelance developer who loves every opportunity to tinker with something new in a tech demo.