In the last issue of the Tech Times, I mentioned I was hard at work with the team here on a new front page design for sitepoint.com. While most of our time has been split between tweaking the CSS styles and crafting the PHP code that will generate the page, any major redesign brings with it the opportunity to improve the HTML code at the heart of your site.
Of course, any newly-written HTML code these days should validate. But there’s more to good HTML code than validation. Validation is the bare minimum you should be doing to assure the quality of your code.
This issue, I’d like to take a look at four simple things you can do to make sure your HTML has that nice, new markup smell.
Take Care Of Your Heading Structure
This is something I’ve banged on about in the Tech Times before. The headings in your document (<h1>, <h2>, etc.) should form a consistent hierarchy: one or more <h1> sections each containing <h2> sections, which in turn may contain <h3>s. Resist the urge to skip heading levels (e.g. placing a <h5> after a <h1>) to indicate levels of “importance” in your content.
The easiest way to check your heading structure nowadays is to use the Web Developer extension in Firefox. Simply click Information ? View Document Outline to see the outline of your page in a new tab.
SitePoint’s current home page doesn’t hold up too well to this test. Heading tags are chosen very much by the perceived importance of the text they contain. Heading levels are skipped, and important sub-headings are routinely given lower heading levels than the titles of the sections that contain them. In some places, non-heading text is even marked up using heading tags.
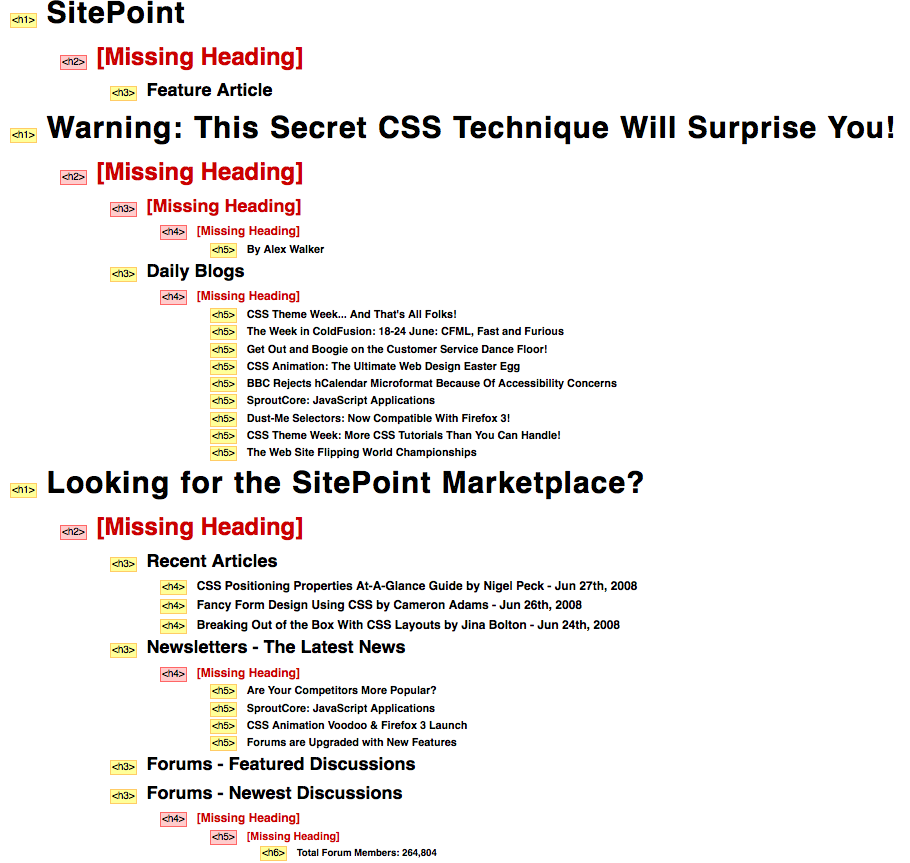
This type of heading structure is virtually impossible for users of assistive technologies like screen readers to navigate. It’s valid HTML, but it doesn’t do much to describe the structure of the content it is intended to describe.
The new HTML front page solves all of these issues. Since the front page represents the site as a whole, the page contains a single <h1>. All of the sections of the page are then marked with <h2> tags within that top-level section.

Although the titles of articles may be styled with larger fonts than structural headings like “Latest News”, the actual tags that are used to mark them up are chosen to describe the structure of the page, providing a useful map for screen reader users to navigate.
Replace Named Anchors With IDs
This one’s dead simple, but it’s something I still see developers who have been writing HTML for a long time get wrong. If you want to provide links to particular spots within a page (e.g. https://www.sitepoint.com/#news), you don’t need to fill your HTML code with <a name=""> tags—just use the id attribute on the elements you already do have!
In the past, if you wanted to provide a link to the ‘News’ section of your page, you’d have to do something like this:
<h2><a name="news"></a>News</h2>These days, all browsers support in-page links based on the id attribute as well as the old-fashioned <a name=""> tag. So instead of the above, you can just do this:
<h2 id="news">News</h2>A link to "#news" in this page will find either of the above example headings, but the second one is a lot neater, and also gives you the ability to apply styles to to heading based on its unique identifier if you need to.
Declare Your Language
It may be obvious to you what language the content of your document is written in, but to search engines and assistive technologies, this is an important piece of information that can be difficult to guess correctly.
Make sure the <html> tag in all your documents contain a lang attribute that identifies the primary language in use in your document. For English, set it to "en":
<html lang="en">If your document is XHTML, you should also set the xml:lang attribute, which will be recognized by systems that understand XML:
<html xmlns="https://www.w3.org/1999/xhtml" lang="en" xml:lang="en">Declare Your Character Encoding
This is another axe I have to grind with many developers who should know better. The Tech Times #134 focused entirely on character encodings, and what every web developer should know about them. SitePoint later published Tommy Olsson’s article, The Definitive Guide to Web Character Encoding.
In short, an encoding describes how the binary bytes that your web server sends to the browser may be translated into the characters of text that make up your HTML code. If you don’t specify an encoding, the browser has to guess.
Depending on how your code editor is configured, chances are that you are encoding your HTML in plain Latin 1 (ISO-8859-1), in the extended version of Latin 1 called Windows-1252, or in the Unicode encoding UTF-8. UTF-8 lets you include the widest range of characters in your code, but current browsers will assume your code is Windows-1252 unless you tell them otherwise.
To encode your HTML pages in UTF-8, first make sure your text editor (along with the text editors of everyone working on your site) is set to default to UTF-8 encoding. If you’re using a simple editor like Notepad, you may have to tell it to save with UTF-8 encoding every time you create a new file—one more reason to avoid Notepad.
Once you’ve done that, make sure to include a <meta> tag in the <head> of all your HTML documents that declares the page as being encoded using UTF-8:
<meta http-equiv="content-type" content="text/html; charset=UTF-8"/>The earlier this tag appears in the document, the less time the browser will have to waste guessing the document’s encoding, so it should really be the first thing to follow your opening <head> tag.
Finally, test one of these pages on your site to make sure that browsers recognize it as being encoded with UTF-8. In Firefox, you can right-click on the background of the page and choose Page Info. The Encoding should be shown on the first tab of the Page Info window. If it isn’t UTF-8, talk to your server admin to see about either getting the correct encoding declared in your site’s HTTP Response headers, or simply removing the encoding from these headers so that the <meta> tag can do its thing.
Any Suggestions?
Those are just four ways to freshen up your markup with the latest HTML techniques. If you can think of any others, be sure to leave a comment! I’d love to hear how you go the extra mile to make your HTML markup look sexy and new.
 Kevin Yank
Kevin Yank is an accomplished web developer, speaker, trainer and author of Build Your Own Database Driven Website Using PHP & MySQL and Co-Author of Simply JavaScript and Everything You Know About CSS is Wrong! Kevin loves to share his wealth of knowledge and it didn't stop at books, he's also the course instructor to 3 online courses in web development. Currently Kevin is the Director of Front End Engineering at Culture Amp.