So far in this series, we’ve looked at the Line Tools, the Shape Tools and the Pencil and Smooth Tools. Today we’re looking at one of the most important, and most frustrating tools for “newbies” – the Pen. I’ve been teaching both Photoshop and Illustrator for several years now, and without doubt, the Pen tool is probably the most feared and avoided tool in both programs. But with a bit of practice and perseverance, you’ll find that the ability to use the Pen tool really opens up a whole new world for you, and will become second nature to you very quickly. So let’s get started with using the tool to draw straight lines.
 When you are drawing with the pen tool, you are placing anchor points on the artboard. The anchor points are joined by a path, forming a line segment, which can be a straight line or a curved line.
Drawing Straight Lines
You can draw straight line open paths, or closed paths.
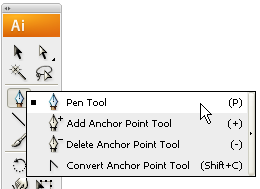
1. Select the Pen tool
When you are drawing with the pen tool, you are placing anchor points on the artboard. The anchor points are joined by a path, forming a line segment, which can be a straight line or a curved line.
Drawing Straight Lines
You can draw straight line open paths, or closed paths.
1. Select the Pen tool ![]() from the toolbox or hit P as a shortcut.
When you first select the pen tool, a small x will appear beside the cursor, indicating that you are about to start a new path.
from the toolbox or hit P as a shortcut.
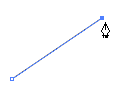
When you first select the pen tool, a small x will appear beside the cursor, indicating that you are about to start a new path. ![]() 2. Click once on the artboard where you want the straight line segment to begin. Do not drag.
If direction lines appear (they look like extra lines coming out of an anchor point), you’ve accidentally dragged the Pen tool; choose Ctrl + Z (windows) or Cmd + Z (Mac) to undo, and click again.
3. Click again where you want to add the next anchor point.
2. Click once on the artboard where you want the straight line segment to begin. Do not drag.
If direction lines appear (they look like extra lines coming out of an anchor point), you’ve accidentally dragged the Pen tool; choose Ctrl + Z (windows) or Cmd + Z (Mac) to undo, and click again.
3. Click again where you want to add the next anchor point.
 Shift-click to constrain the angle of the segment to a multiple of 45°.
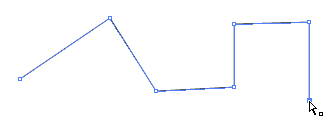
4. Continue clicking to set anchor points for additional straight segments.
Shift-click to constrain the angle of the segment to a multiple of 45°.
4. Continue clicking to set anchor points for additional straight segments.
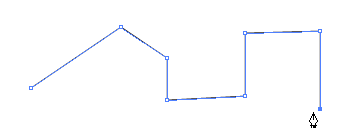 The last point you add will always appears as a solid square, meaning that it is selected. The other anchor points you’ve added will appear hollow.
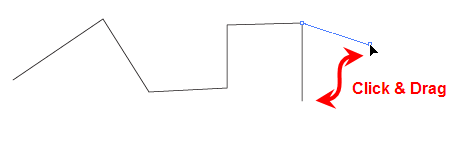
Complete the path by doing one of the following:
The last point you add will always appears as a solid square, meaning that it is selected. The other anchor points you’ve added will appear hollow.
Complete the path by doing one of the following:
- If you want a closed path, position the Pen tool over the first anchor point you put on the artboard. A small circle appears next to the Pen tool pointer
 indicating that the path will close correctly. Click to close the path.
 - If you want to leave the path open, simply, Ctrl + click (Windows) or Cmd + Click (Mac) anywhere away from all objects. You’ll notice that the Pen cursor displays the small x again, meaning that the next time you click with the Pen tool you will be starting another new path.
- Alternatively, you can close a path by clicking on any other tool in the toolbox.
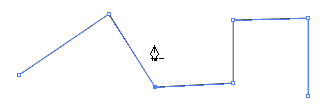 You can see that the shape of the line has now changed.
If you want to add an extra anchor point, click anywhere along a line segment using the Add Anchor Point tool.
So that’s how to draw straight line segments, pretty easy and nothing to be scared of there!
Editing Paths
It’s important to also mention the Selection tools which allow you to edit the paths that you’ve drawn.
You can see that the shape of the line has now changed.
If you want to add an extra anchor point, click anywhere along a line segment using the Add Anchor Point tool.
So that’s how to draw straight line segments, pretty easy and nothing to be scared of there!
Editing Paths
It’s important to also mention the Selection tools which allow you to edit the paths that you’ve drawn.
 To move an anchor point, click on the point with the Direct Selection tool (press A for shortcut)to select it. Shift+click to select multiple points.
 Once you have selected one (or more) points you can then drag that particular point.
 To select all anchor points and the line segments between them, click anywhere on the path with the Selection tool (V).
 Now when you drag, the entire path will move.
Ok, so we’ve looked at drawing straight lines with the Pen and also how to select individual points or the entire path using the Direct Selection and Selection tools. My advice would be to practice making shapes and drawing open and closed paths with the Pen till you feel really comfortable with it.
In the final part of this Illustrator series, I’ll show you how to make curves and combine them with straight segments. Once you have that under your belt you can pretty much draw anything with the Pen.
Related Posts:
Drawing In Illustrator, Part 1: The Line Tools
Drawing In Illustrator, Part 2: The Shape Tools
Drawing In Illustrator, Part 3, The Pencil & Smooth Tools
Now when you drag, the entire path will move.
Ok, so we’ve looked at drawing straight lines with the Pen and also how to select individual points or the entire path using the Direct Selection and Selection tools. My advice would be to practice making shapes and drawing open and closed paths with the Pen till you feel really comfortable with it.
In the final part of this Illustrator series, I’ll show you how to make curves and combine them with straight segments. Once you have that under your belt you can pretty much draw anything with the Pen.
Related Posts:
Drawing In Illustrator, Part 1: The Line Tools
Drawing In Illustrator, Part 2: The Shape Tools
Drawing In Illustrator, Part 3, The Pencil & Smooth Tools
Frequently Asked Questions on Drawing Straight Lines in Illustrator
How Can I Draw Straight Lines with the Pen Tool in Illustrator?
To draw straight lines with the Pen Tool in Illustrator, first select the Pen Tool from the toolbar or press P on your keyboard. Click on the canvas to create the first anchor point. Then, click again where you want the line to end. This will create a straight line between the two points. To continue the line in another direction, simply click on another point on the canvas. To finish the line, either click on the original anchor point to close the shape or press Ctrl (or Command on a Mac) and click anywhere on the canvas to deselect the Pen Tool.
How Can I Adjust the Length and Angle of My Straight Lines in Illustrator?
To adjust the length and angle of your straight lines in Illustrator, use the Direct Selection Tool (A). Click on the anchor point of the line you want to adjust and drag it to your desired position. To maintain the line’s angle while changing its length, hold down the Shift key while dragging the anchor point.
Can I Draw Straight Lines with Other Tools in Illustrator?
Yes, you can draw straight lines with other tools in Illustrator. The Line Segment Tool () is a simple tool specifically designed for drawing straight lines. Just click and drag across the canvas to create a line. The length and angle of the line will be shown in a small tooltip next to the cursor.
How Can I Draw Perfect Horizontal or Vertical Lines in Illustrator?
To draw perfect horizontal or vertical lines in Illustrator, use the Pen Tool or the Line Segment Tool. Click on the canvas to create the first anchor point, then hold down the Shift key while you click to create the second anchor point. Holding the Shift key constrains the angle of the line to multiples of 45 degrees, allowing you to easily create horizontal or vertical lines.
How Can I Change the Color of My Straight Lines in Illustrator?
To change the color of your straight lines in Illustrator, first select the line using the Selection Tool (V) or the Direct Selection Tool (A). Then, in the Properties panel, click on the Stroke color swatch and choose a new color from the Color Picker.
How Can I Change the Thickness of My Straight Lines in Illustrator?
To change the thickness of your straight lines in Illustrator, first select the line using the Selection Tool (V) or the Direct Selection Tool (A). Then, in the Properties panel, adjust the Stroke weight to your desired thickness.
Can I Draw Dashed or Dotted Lines in Illustrator?
Yes, you can draw dashed or dotted lines in Illustrator. After drawing a straight line, select it and go to the Stroke panel. Check the Dashed Line box and adjust the dash and gap values to create your desired dashed or dotted line pattern.
How Can I Draw Diagonal Lines in Illustrator?
To draw diagonal lines in Illustrator, use the Pen Tool or the Line Segment Tool. Click on the canvas to create the first anchor point, then click again at a different horizontal and vertical position to create a diagonal line.
Can I Save My Straight Lines as Custom Shapes in Illustrator?
Yes, you can save your straight lines as custom shapes in Illustrator. After drawing a straight line, go to the Brushes panel and click on the New Brush button. Choose the Art Brush option and adjust the settings to your liking. Your straight line will be saved as a custom brush that you can use to draw the same line with a single click.
How Can I Draw Parallel Straight Lines in Illustrator?
To draw parallel straight lines in Illustrator, first draw a straight line using the Pen Tool or the Line Segment Tool. Then, with the line selected, go to Object > Transform > Move. Enter your desired distance in the Vertical or Horizontal field and click Copy. This will create a copy of the line at the specified distance, creating a set of parallel lines.
 Jennifer Farley
Jennifer Farley is a designer, illustrator and design instructor based in Ireland. She writes about design and illustration on her blog at Laughing Lion Design.