Illustrator is not only an industry standard for creating vector graphics, it’s also really good fun to use. This guide is intended mainly for people who are new to using Illustrator, but even if you’ve been using the program for a while you might find this a useful refresher course.
Principles and terminology
We won’t get bogged down too much with theory but there are some concepts you’ll need to get your head around when you are drawing in Illustrator.
Illustrator creates vector-based artwork. This means it can be resized without distortion. If you want to design a logo that can be made small enough to fit on a baseball cap AND enlarged enough to fill a billboard, vectors are the way to go.
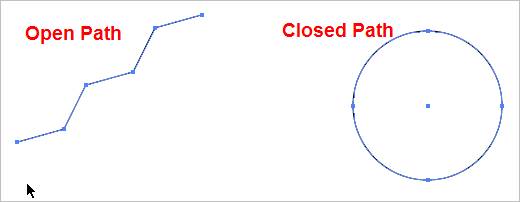
When you’re drawing in Illustrator, you create a line called a path. A path is made up of one or more straight or curved segments. The beginning and end of each segment are marked by anchor points. A path can be closed (for example, a circle), or open, with distinct endpoints (for example, a wavy line).
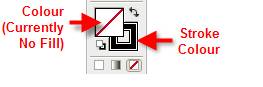
 Let’s get started with Illustrator’s line tools. It’s important to understand that when you draw a path with these tools, the colour of the line will be the colour you have chosen for the stroke, the path itself is a non-printing element.
 Drawing Lines
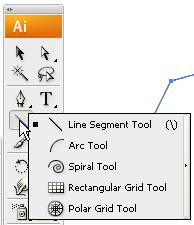
The Line Segment tool is the top tool in the toolbox that includes the Arc tool, the Spiral tool, and Grid tools. To see all of the hidden line tools, just click and hold the pointer over the Line Segment tool. You’ll see the Arc tool, Spiral tool and Grid tools.
Drawing Lines
The Line Segment tool is the top tool in the toolbox that includes the Arc tool, the Spiral tool, and Grid tools. To see all of the hidden line tools, just click and hold the pointer over the Line Segment tool. You’ll see the Arc tool, Spiral tool and Grid tools.
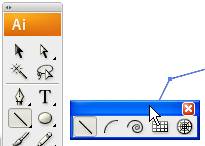
 In Illustrator, you can “tear-off” a set of tools so that they form their own floating palette. Just click on the small triangle on the right hand side of the hidden tool fly out.
 1. The Line Segment Tool
Drawing a line with the Line Segment tool is a good way to become familiar with generating paths in Illustrator. Select the Line Segment tool and do either one of the following:
1. The Line Segment Tool
Drawing a line with the Line Segment tool is a good way to become familiar with generating paths in Illustrator. Select the Line Segment tool and do either one of the following:
- Position the pointer where you want the line to begin, and click and drag to where you want the line to end.
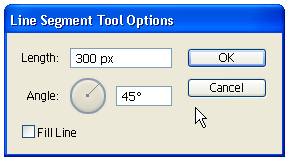
- Click on the artboard where you want the line to begin. A dialog box opens, and you can specify the length and angle of the line. If you want to fill the line with the current fill colour, select Fill Line. Then click OK. The line will be drawn as specified.
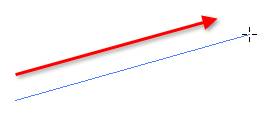
 When drawing a freehand line segment, you can constrain an angle to an increment of 45 degrees by holding down the Shift key as you draw the line segment. To draw a line segment symmetrically around a central radius, hold down the Option (Mac) or Alt (Windows) key.
Holding down Shift + Option (Mac) or Shift + Alt (Windows) as you draw a line segment creates a line that expands from a center point and is constrained to increments of 45 degrees
2. The Arc Tool
When you draw an arc, you’re creating a line segment that curves. To draw a freehand arc;
1. Select the Arc tool
When drawing a freehand line segment, you can constrain an angle to an increment of 45 degrees by holding down the Shift key as you draw the line segment. To draw a line segment symmetrically around a central radius, hold down the Option (Mac) or Alt (Windows) key.
Holding down Shift + Option (Mac) or Shift + Alt (Windows) as you draw a line segment creates a line that expands from a center point and is constrained to increments of 45 degrees
2. The Arc Tool
When you draw an arc, you’re creating a line segment that curves. To draw a freehand arc;
1. Select the Arc tool 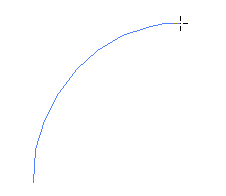 Hold down the Shift key to constrain the arc to increments of 45 degrees.
Hold down the Option (Mac) or Alt (Windows) key as you draw to create an arc using the initial click point as a center point.
You can also use the Arc tool dialog box to set up more sophisticated curves.
1. Select the Arc tool
Hold down the Shift key to constrain the arc to increments of 45 degrees.
Hold down the Option (Mac) or Alt (Windows) key as you draw to create an arc using the initial click point as a center point.
You can also use the Arc tool dialog box to set up more sophisticated curves.
1. Select the Arc tool 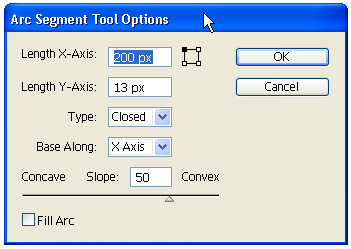 Length X Axis
Specifies the width of the arc.
Length Y Axis
Specifies the height of the arc.
Type
Specifies whether you want the object to be an open path or a closed path.
Base Along
Specifies the direction of the arc. Choose X Axis or Y Axis depending on whether you want to draw the base of the arc along the horizontal (x) axis or vertical (y) axis.
Slope
Specifies the direction of the arc’s slope. Enter a negative value for a concave (inward) slope. Enter a positive value for a convex (outward) slope. A slope of 0 creates a straight line.
Fill Arc
Fills the arc with the current fill colour.
3. The Spiral Tool
To draw a freehand spiral
1. Select the Spiral tool
Length X Axis
Specifies the width of the arc.
Length Y Axis
Specifies the height of the arc.
Type
Specifies whether you want the object to be an open path or a closed path.
Base Along
Specifies the direction of the arc. Choose X Axis or Y Axis depending on whether you want to draw the base of the arc along the horizontal (x) axis or vertical (y) axis.
Slope
Specifies the direction of the arc’s slope. Enter a negative value for a concave (inward) slope. Enter a positive value for a convex (outward) slope. A slope of 0 creates a straight line.
Fill Arc
Fills the arc with the current fill colour.
3. The Spiral Tool
To draw a freehand spiral
1. Select the Spiral tool 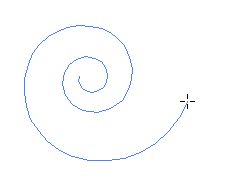 To use the Spiral tool dialog box;
1. Select the Spiral tool from the toolbox.
Click once on the artboard where you want the spiral to begin. In the dialog box, you can set any of the following options, and click OK.
To use the Spiral tool dialog box;
1. Select the Spiral tool from the toolbox.
Click once on the artboard where you want the spiral to begin. In the dialog box, you can set any of the following options, and click OK.
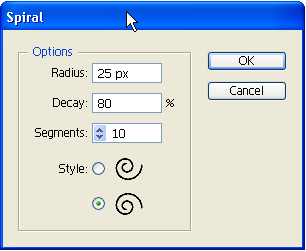 Radius
Specifies the distance from the center to the outermost point in the spiral.
Decay
Specifies the amount by which each wind of the spiral should decrease relative to the previous wind.
Segments
Specifies how many segments the spiral has. Each full wind of the spiral consists of four segments.
Style
Specifies the direction of the spiral.
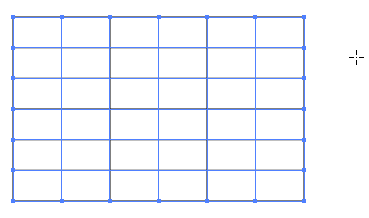
4. The Rectangular Grid
You might like to use the rectangular grid either for layout of data or even as part of layered design.
1. Select the Rectangular Grid tool
Radius
Specifies the distance from the center to the outermost point in the spiral.
Decay
Specifies the amount by which each wind of the spiral should decrease relative to the previous wind.
Segments
Specifies how many segments the spiral has. Each full wind of the spiral consists of four segments.
Style
Specifies the direction of the spiral.
4. The Rectangular Grid
You might like to use the rectangular grid either for layout of data or even as part of layered design.
1. Select the Rectangular Grid tool - Click and drag on the artboard until the grid is the size you want.
- Click once on the artboard open the rectangular grid dialog box. In the dialog box, click a square on the reference point locator
 to specify the point from which the grid is drawn. Then set any of the following options, and click OK.
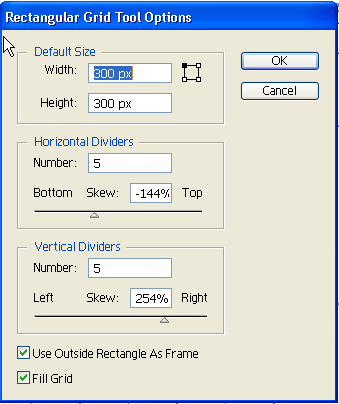
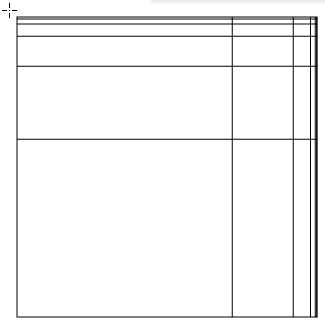 Default Size
Specifies the width and height of the entire grid.
Horizontal Dividers
Specifies the number of horizontal dividers you want to appear between the top and bottom of the grid. The Skew value determines how the horizontal dividers are weighted toward the top or bottom of the grid.
Vertical Dividers
Specifies the number of dividers you want to appear between the left and right sides of the grid. The Skew value determines how the vertical dividers are weighted to the left or right side.
Use Outside Rectangle As Frame
Replaces the top, bottom, left, and right segments with a separate rectangular object.
Fill Grid
Fills the grid with the current fill color (otherwise, the fill is set to none).
5. The Polar Grid Tool
This works in a similar fashion to the Rectangle Grid, except that it creates a circular grid. To use this tool;
1.Select the Polar Grid tool
Default Size
Specifies the width and height of the entire grid.
Horizontal Dividers
Specifies the number of horizontal dividers you want to appear between the top and bottom of the grid. The Skew value determines how the horizontal dividers are weighted toward the top or bottom of the grid.
Vertical Dividers
Specifies the number of dividers you want to appear between the left and right sides of the grid. The Skew value determines how the vertical dividers are weighted to the left or right side.
Use Outside Rectangle As Frame
Replaces the top, bottom, left, and right segments with a separate rectangular object.
Fill Grid
Fills the grid with the current fill color (otherwise, the fill is set to none).
5. The Polar Grid Tool
This works in a similar fashion to the Rectangle Grid, except that it creates a circular grid. To use this tool;
1.Select the Polar Grid tool - Click and Drag until the grid is size you want.
- To open the dialog box for the tool, click once on the artboard. In the dialog box, click a square on the reference point locator to specify from which corner point the grid is drawn. Then set any of the following options, and click OK.
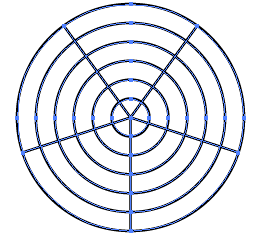
 Default Size
Specifies the width and height of the entire grid.
Concentric Dividers
Specifies the number of circular concentric dividers you want to appear in the grid. The Skew value determines how the concentric dividers are weighted toward the inside or outside of the grid.
Radial Dividers
Specifies the number of radial dividers you want to appear between the center and the circumference of the grid. The Skew value determines how the radial dividers are weighted counterclockwise or clockwise on the grid.
Create Compound Path From Ellipses
Converts the concentric circles into separate compound paths and fill every other circle.
Fill Grid
Fills the grid with the current fill color (otherwise, the fill is set to none).
Ok, so those are the line tools. They’re all easy to use but I would recommend that as well as practicing drawing freehand with each one, that you also try out the dialog boxes for each so that you can see how precise you can be with these tools.
Tomorrow we’ll take a look at the Shape tools and later in the week the Pen tool.
Default Size
Specifies the width and height of the entire grid.
Concentric Dividers
Specifies the number of circular concentric dividers you want to appear in the grid. The Skew value determines how the concentric dividers are weighted toward the inside or outside of the grid.
Radial Dividers
Specifies the number of radial dividers you want to appear between the center and the circumference of the grid. The Skew value determines how the radial dividers are weighted counterclockwise or clockwise on the grid.
Create Compound Path From Ellipses
Converts the concentric circles into separate compound paths and fill every other circle.
Fill Grid
Fills the grid with the current fill color (otherwise, the fill is set to none).
Ok, so those are the line tools. They’re all easy to use but I would recommend that as well as practicing drawing freehand with each one, that you also try out the dialog boxes for each so that you can see how precise you can be with these tools.
Tomorrow we’ll take a look at the Shape tools and later in the week the Pen tool.
Frequently Asked Questions (FAQs) about Drawing in Illustrator
What are the basic line tools in Adobe Illustrator and how do they function?
Adobe Illustrator offers a variety of line tools that can be used to create different shapes and designs. The basic line tools include the Line Segment Tool, Arc Tool, Spiral Tool, Rectangular Grid Tool, and Polar Grid Tool. The Line Segment Tool is used to draw straight lines, while the Arc Tool is used to draw curved lines. The Spiral Tool allows you to create spiral designs, and the Rectangular Grid Tool and Polar Grid Tool are used to create grid patterns. Each tool has its own unique function and can be used in combination to create complex designs.
How can I modify the lines I’ve drawn in Illustrator?
Once you’ve drawn a line in Illustrator, you can modify it using various tools and options. The Direct Selection Tool allows you to select individual anchor points on the line and move them to change the shape of the line. The Stroke panel lets you adjust the thickness, color, and style of the line. You can also use the Pen Tool to add or remove anchor points, allowing you to further modify the shape of the line.
What is the difference between a path and a line in Illustrator?
In Illustrator, a line is a straight or curved segment that connects two points, while a path is a series of connected lines or curves. A path can be open (like a line) or closed (like a circle or rectangle). Paths are the basic building blocks of Illustrator, and understanding how to create and manipulate them is key to mastering the software.
How can I create complex shapes using the line tools in Illustrator?
Creating complex shapes in Illustrator often involves using multiple line tools and combining their outputs. For example, you can use the Line Segment Tool to create the sides of a polygon, and then use the Direct Selection Tool to adjust the position of each point and create a more complex shape. You can also use the Shape Builder Tool to combine multiple shapes into one.
What are the best practices for drawing in Illustrator?
When drawing in Illustrator, it’s important to start with a clear idea of what you want to create. Use the appropriate line tool for the shape you’re trying to create, and take advantage of the software’s ability to create perfect geometric shapes. Remember to use layers to keep your work organized, and don’t be afraid to experiment with different tools and techniques.
How can I improve my drawing skills in Illustrator?
Practice is key when it comes to improving your drawing skills in Illustrator. Try to spend some time each day working with the software, and don’t be afraid to experiment with different tools and techniques. There are also many online tutorials and courses that can help you learn new skills and techniques.
Can I use Illustrator to create 3D designs?
Yes, Illustrator has a variety of tools and features that can be used to create 3D designs. The 3D effect, for example, allows you to transform 2D shapes into 3D objects. You can also use the Perspective Grid Tool to create 3D scenes and objects.
How can I use the Pen Tool effectively in Illustrator?
The Pen Tool is one of the most powerful tools in Illustrator, allowing you to create complex paths with precision. To use it effectively, it’s important to understand how anchor points and handles work. Practice creating straight and curved lines, and experiment with adding, deleting, and moving anchor points.
What are some common mistakes to avoid when drawing in Illustrator?
Some common mistakes to avoid when drawing in Illustrator include not using layers to organize your work, not taking advantage of the software’s ability to create perfect geometric shapes, and not saving your work frequently. It’s also important to avoid using raster images in your designs, as they can become pixelated when scaled.
How can I use Illustrator to create vector graphics?
Illustrator is a vector graphics software, which means it’s designed to create scalable, resolution-independent graphics. To create vector graphics in Illustrator, you can use the various drawing tools to create shapes, and then use the Direct Selection Tool and Pen Tool to modify those shapes. You can also use the Pathfinder panel to combine and divide shapes.
 Jennifer Farley
Jennifer Farley is a designer, illustrator and design instructor based in Ireland. She writes about design and illustration on her blog at Laughing Lion Design.