If someone mentions the term Content Management System, probably WordPress, Joomla, Drupal, and others come to mind. But the only content types supported by WordPress out of the box are pages and articles, which is fine for most websites, but what if you want more? Luckily you can use the Pods Framework; it’s a WordPress plugin which enables you to add custom content types and their management to your WordPress installation. I’ll show you some of Pods Framework’s functionality by giving you a quick tutorial on how you we can use it to make a library site. The site will contain an overview page with all of the books we currently have, and when the user clicks on a book link he’ll see its details.
Adding Content Types
First you have to install the framework. Just use the plugin installer in your WordPress backend like you always do; the full name of the plugin is Pods CMS Framework. After installation, click on the Pods menu item in the side menu. Like the description says, a pod is a named group of input fields, which means that it’s a custom content type with properties which you define. Click the “Add new pod” button and create a pod named “books”.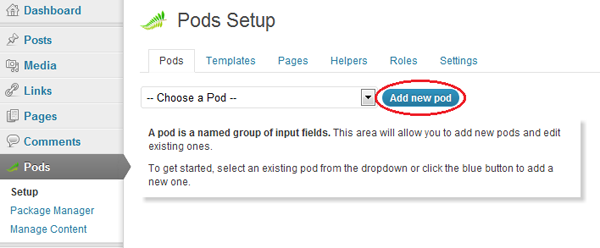 After you make the book pod, the screen changes to show its properties:
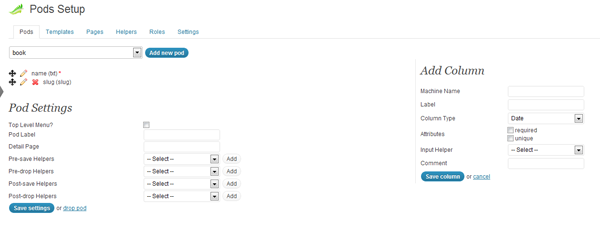 By default, our new pod already has the columns name and slug. In this example, we won’t need slug, so just click the red X to the left of it to delete it. The book does however need some more information, such as its publisher, description, genre, author, publication date, and the book cover. Let’s create them now.
At the right you’ll see the ‘Add Column’ section. Enter appropriate column names in the Machine Name field and use ‘Single Line Text’ for the Column Type, except for the publication date and description. The type for the publication date should be Date, and the description should be ‘Paragraph Text’. As for the cover, we can just store an URL string to the image.
By default, our new pod already has the columns name and slug. In this example, we won’t need slug, so just click the red X to the left of it to delete it. The book does however need some more information, such as its publisher, description, genre, author, publication date, and the book cover. Let’s create them now.
At the right you’ll see the ‘Add Column’ section. Enter appropriate column names in the Machine Name field and use ‘Single Line Text’ for the Column Type, except for the publication date and description. The type for the publication date should be Date, and the description should be ‘Paragraph Text’. As for the cover, we can just store an URL string to the image.
Pages and Templates
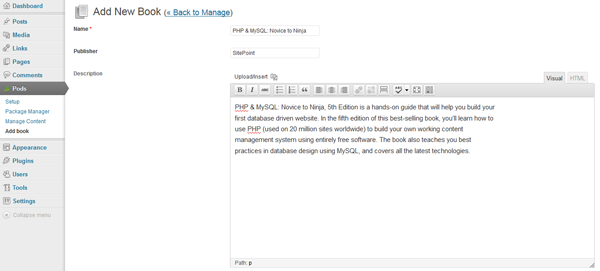
Once the pod is configured, go back to the side Pods menu and click Add book.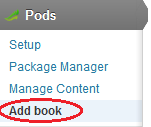 Add a few of your favorite books as an example, providing the necessary information and saving your work.
 To display our pages correctly, we’ll need to make a small theme modification. Go to the theme’s directory (I’m using Twentyeleven for this example) and create a new file named
 pods.php. The content should be:
<?php
/*
Template Name: Custom Pods template
*/

get_header();
?>
<div id="primary">
<div style="width: 93%;" id="content" role="main">
<article id="post-0" class="post page hentry">
<?php pods_content(); ?>
</article>
</div>
</div>
<?php
get_sidebar();
get_footer();
?><h1><b>Book List</b></h1>
<?php
$pods = new Pod('book');
$pods->findRecords('id DESC', 10);
while ($pods->fetchRecord()) {
echo '<li><a href="/book/' . $pods->get_field('id') . '">' . $pods->get_field('name') . '</a></li>'; //Create a link to each different book
}
?>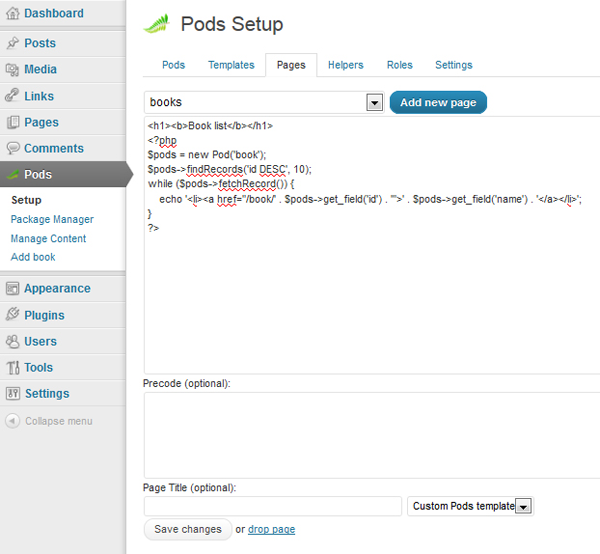 In order to view the pages correctly, there’s one additional configuration change we need to make. Go to Settings > Permalinks, select ‘Custom Structure’, and in the text field type ‘/%postname%/’. Now you should be able to view the page you just created by going to
 yoursite.com/books.
We still need to create a page which displays the book information, so click Pods’ ‘Add new page’ button again and use the name ‘book/*’. The * is important because it is a wildcard in the URL, in our case the id of the book.
We can retrieve the first wildcard value (and in our case the only one) by with the pods_url_variable() function.
This is the code to use for our books/* page:
<?php
// store the book’s id into $bookId
$bookId = pods_url_variable(1);

// retrieves all book entries which fullfill the parameter requirement
$params = array('where'=>'t.id = '. $bookId);
$book = new Pod('book', $params);

// the pods is mostly a data class which contains multiple pod objects
while ($book->fetchRecord()) {
// use get_field() to retrieve the value of a specific field
echo '<h1>' . $book->get_field('name') . '</h1><br />';
echo '<img src="' . $book->get_field('cover') . '" /><br />';
echo 'Autor: ' . $book->get_field('autor') . '<br />';
echo 'Publisher: ' . $book->get_field('publisher') . '<br />';
echo 'Release date: ' . $book->get_field('release') . '<br />';
}
?>Frequently Asked Questions about Turning WordPress into a CMS with Pods Framework
What is the Pods Framework and how does it transform WordPress into a CMS?
The Pods Framework is a powerful WordPress plugin that allows you to manage all your custom content needs in one location. It enables you to create and manage custom post types, fields, and taxonomies directly within your WordPress interface. This transforms WordPress into a fully-fledged Content Management System (CMS), giving you the flexibility to design and structure your content in a way that best suits your needs.
How do I install the Pods Framework on my WordPress site?
Installing the Pods Framework is straightforward. Navigate to your WordPress dashboard, click on ‘Plugins’, then ‘Add New’. In the search bar, type ‘Pods Framework’ and click ‘Install Now’. Once installed, click ‘Activate’ to start using the Pods Framework.
Can I use Pods Framework with my existing WordPress themes?
Yes, the Pods Framework is compatible with most WordPress themes. It works seamlessly with your existing theme, allowing you to add custom fields and post types without altering your theme’s code.
How do I create custom post types with Pods Framework?
To create a custom post type, navigate to the Pods admin area in your WordPress dashboard. Click on ‘Add New’, then ‘Create New’. Enter the singular and plural labels for your post type, then click ‘Next Step’. You can then add custom fields to your post type and configure its settings.
Is Pods Framework compatible with page builders like Divi?
Yes, Pods Framework works well with most popular page builders, including Divi. You can use the two together to create highly customizable layouts and designs for your content.
How do I display custom fields in my theme with Pods Framework?
To display custom fields in your theme, you’ll need to edit your theme’s template files. You can use the ‘pods_field’ function to display the value of a custom field. For example, to display a custom field named ‘price’, you would use the following code:
Can I use Pods Framework to create custom taxonomies?
Yes, Pods Framework allows you to create custom taxonomies for your post types. This can be done from the Pods admin area in your WordPress dashboard.
Is Pods Framework SEO-friendly?
Yes, Pods Framework is SEO-friendly. It allows you to create SEO-friendly URLs for your custom post types and taxonomies, and it’s compatible with popular SEO plugins like Yoast SEO.
Can I migrate my custom post types and fields to another site with Pods Framework?
Yes, Pods Framework includes a built-in migration feature that allows you to export and import your custom post types and fields between different WordPress sites.
Is Pods Framework free to use?
Yes, Pods Framework is a free and open-source plugin. However, they do offer a premium support service for users who need additional help or features.
 SitePoint Sponsors