This tutorial will outline how to use the Gravity Forms plugin combined with the Gravity Forms – PayPal Payments Standard Add-On plugin to create custom forms that handle payments in your WordPress website.
We will briefly look at how Gravity Forms works, and how using its additional payment add-on can let you take payments and capture information at the same time. We will not be focusing on the design of the forms or how feature rich they are. What I intend to showcase is how to use this plugin to create quick and simple forms to capture data for manipulation (leaving the plugin to do the heavy lifting of payment processing).
Warning – These Are Not Free Plugins
Please note that Gravity Forms (and its associated PayPal plugin that will be used) are not free plugins.
Gravity Forms has a subscription based model where you are either a ‘Personal’, ‘Business’ or ‘Developer’ user, and you purchase access to the plugin. To use the PayPal payments functionality you need to have the ‘Developer’ license to download the required add-on. This tutorial will require the use of these plugins.
What Is Gravity Forms?
Gravity Forms is a form building plugin that allows you to quickly and easily create customised forms using a click and drag interface. You can create a wide variety of forms using this plugin, ranging from simple contact inquiries to advanced, conditionally built forms.
With Gravity Forms you can create forms with all the standard form elements you expect; text fields, select lists, check-boxes, and radio boxes. In addition, it also comes with several useful elements such as date selectors, phone numbers, CAPTURE and lists.
Using this plugin you can easily put together a form that you can then output on your chosen page or post (using their shortcode).
Gravity Forms Add-ons and Payments
While Gravity Forms does a great job of creating forms, sometimes your forms need to do additional processing or logic, or link to third party services. This is where the add-ons for Gravity Forms comes in play.
These additional add-ons/plugins can be viewed and downloaded from their online repository, and once downloaded, they can be uploaded to your website and activated like a regular plugin.
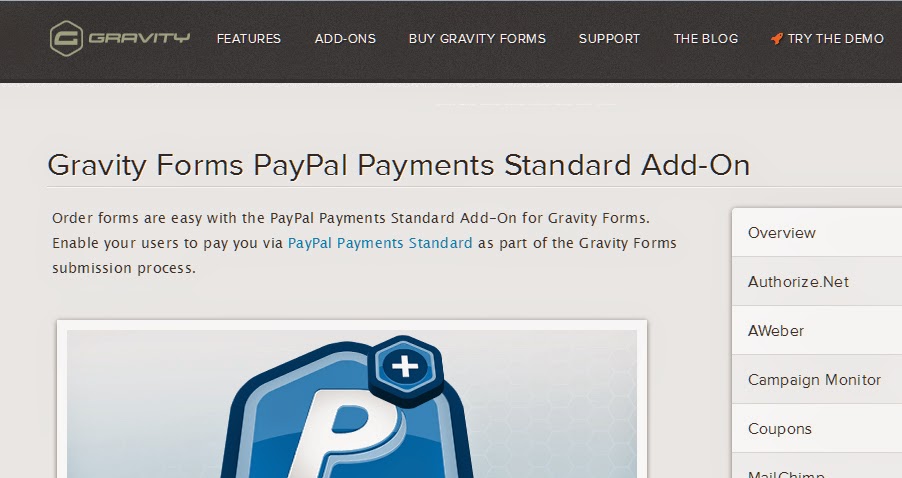
Since this tutorial is discussing payments with PayPal, we will be using the PayPal Payments Standard Add-On. This will allow us to connect our custom forms to a PayPal account and take payments.
There are a number of other PayPal add-ons for Gravity Forms; however these are generally offered for legacy PayPal accounts (or accounts that require special functions). For almost all current accounts (and new PayPal accounts), this will be the right plugin to choose.
The Scenario – a Membership Form
To showcase how this plugin can be useful, we will use it to create a membership form that takes applications for membership to an online community.
In our scenario, we want to capture information about an individual and then process their payment. We will be collecting all of the standard information you would expect such as name, email, phone number and so on.
Once they have completed their payment, we will then email an address with all of the information.
The purpose of this scenario is to get you to a point where you have access to all of your form data and information from a successful transaction. Once you are at this point, you can use the information to create a membership profile, create some automated emails or manipulate the data however you want.
Getting Started
First things first, you will need to have the following elements so you can proceed with this tutorial:
- Gravity Forms Plugin
- Gravity Forms PayPal Payments Standard Add-On
- A WordPress instance set up using the latest version (I have tested this to work from WP 3.7+)
- FTP Access (we will be using Gravity Form’s hooks/filters so you need to have access to your functions.php or similar)
As stated before, Gravity Forms is not a free plugin and you must purchase a subscription to use it. Once you have a subscription, you can download the plugins you require (for the PayPal integration you will need the developer level license).
Once you have all of these elements sorted, we will get straight into creating a forms for taking payments.
Step 1 – Connecting Gravity Forms to PayPal
Because Gravity Forms is handling payments and transitions along with PayPal, PayPal will need to be configured so that when it processes payments it notifies Gravity Forms (which it will use to update its transaction information; for example marking an order as completed).
Navigate to the back-end of your website and go to the ‘Forms’ menu and look for the ‘Settings’ tab. From the Settings tab, you’ll need to look for the sub-menu called ‘PayPal’. Once you’ve clicked on the ‘PayPal’ sub-menu, you should see the following screen.
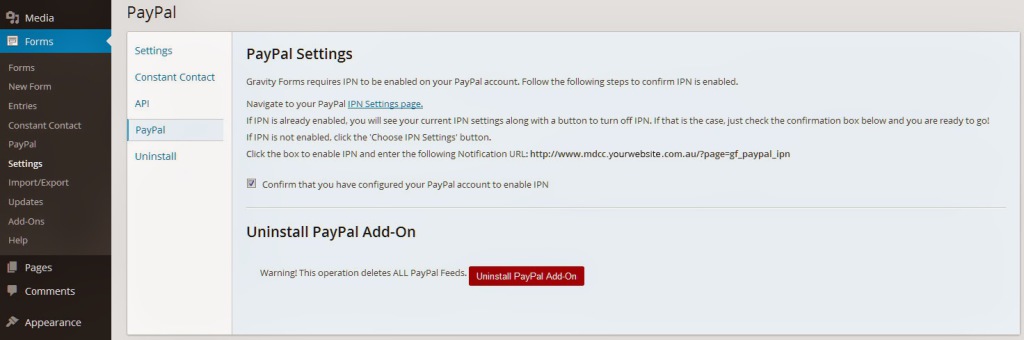
What you need to do is copy the URL provided on this page and go to your PayPal account. You will need to log into the account that you intend to take payments with, and enable IPN processing. You will see a similar screen to the one below.
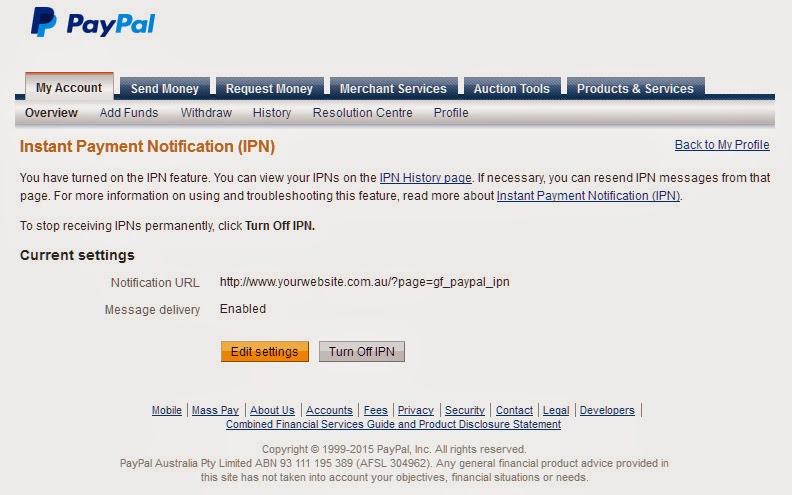
Once you update your IPN settings on PayPal, return to to your Settings page on your website and enable the check-box, confirming that your IPN has been correctly set up.
Note: If you do not do this step, various hooks and filters will never fire and you will be left wondering why nothing seems to work.
Step 2 – Creating Your Membership Form
Navigate over to the WordPress back-end and look for the ‘Forms’ menu. You can press this to be brought to the listing of all of your forms, or you could alternatively click the ‘New Form’ button.
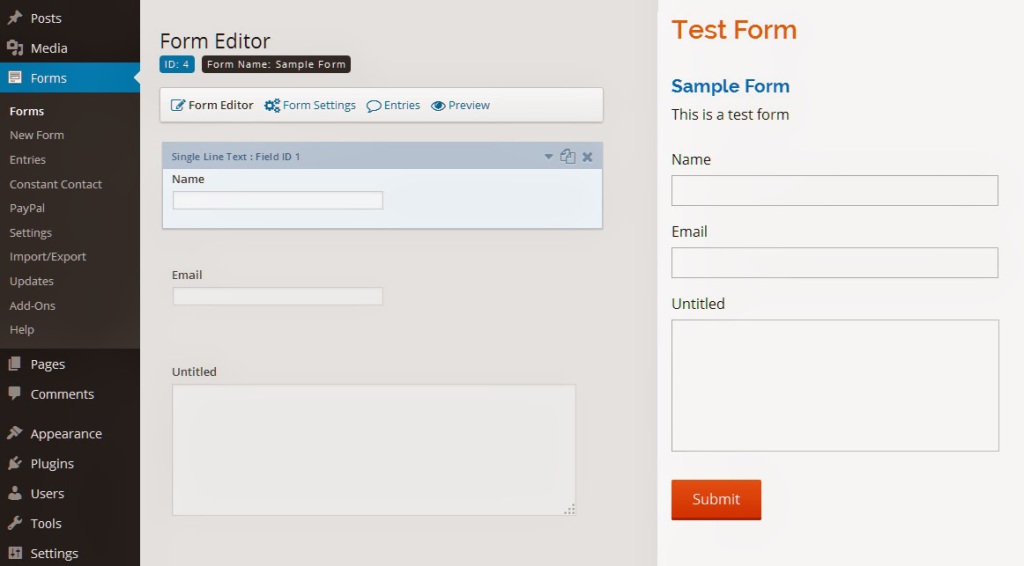
Once you click on the ‘New Form’ button, a window will appear. Simply enter the name of the form and a brief description and once redirected you will see the following screen.
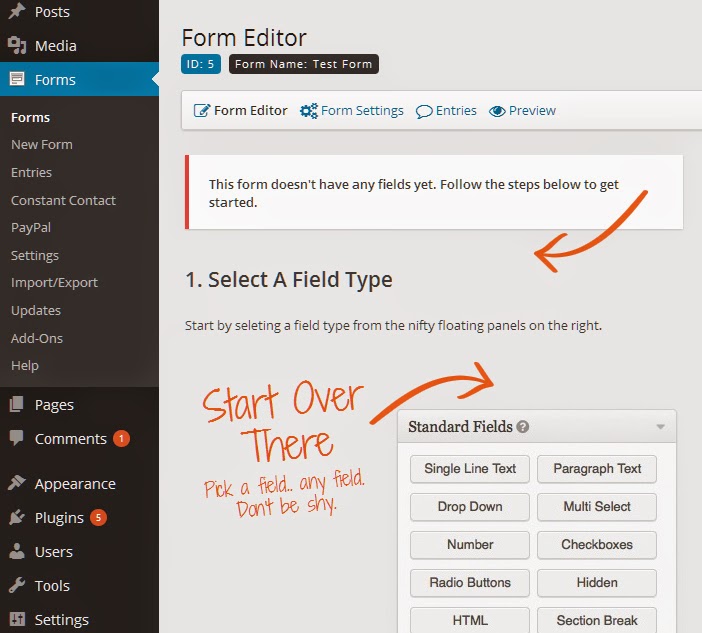
Gravity Forms is split up into two sections. The left section will show you the current elements in your form; while the right side has a listing of all the form elements you can add (conveniently grouped together by function).
If you require more in-depth understanding of how Gravity Forms work I would suggest reading their documentation on their website.
Adding Your Form Fields
What you will now need to do is build the form itself. For this example I will be adding these fields to the form. Feel free to follow along or add your own fields.
- First Name – (Standard Fields – Single Line Text)
- Last Name – (Standard Fields – Single Line Text)
- Email – (Advanced Fields – Email)
- Phone – (Advanced Fields – Phone)
- Address – (Advanced Fields – Address)
- Membership Type- (Pricing Fields – Product)
- Total Cost – (Pricing Fields – Total)
Once you have added all of these fields you can move to configuring them for use.
Configuring Your Form Fields
Most of the form fields you can select can be configured with multiple options. Drop down lists can be populated with options, fields can be required to be processed, validation messages can be set, and much more.
For our scenario we are only using 7 fields, so go ahead and click on each field to expand the list of options and configure them as the following:
- First Name, Last Name, Email – Mark these fields as being ‘Required’
- Phone, Total Cost – Leave as is, nothing special
- Address – These steps may be slightly different for you, however I have decided to use the ‘International’ settings, along with ‘Hide Address Line 2 Field’, the default country selected as ‘Australia’ and marked as being ‘Required’
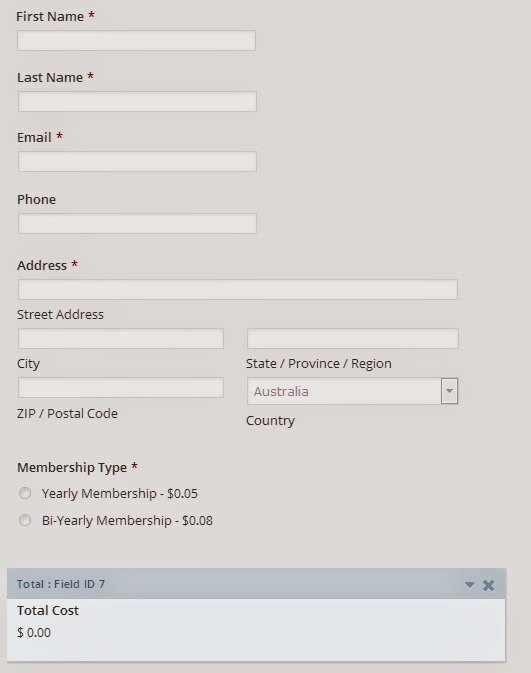
- Membership Type – Since this is a product there are multiple options to choose from. I have selected that the ‘Field Type’** will be ‘Radio Buttons’ with two options: – Yearly Membership ($0.05) – Bi-Yearly Membership ($0.08) – This field will also be ‘Required’
Once you have configured your form fields it should look similar to how mine looks below
Step 3 – Connecting Your Form with PayPal
Now that we have set up Gravity Forms and connected it to your PayPal account, we need to also connect your individual forms to PayPal.
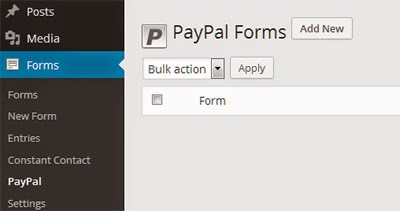
Navigate to the WordPress back-end and look for the ‘Forms’ menu. Under this menu you will see a label called ‘PayPal’. Click this to proceed (if you don’t see this it means you have not installed the PayPal add-on for Gravity Forms).
 The information above may differ depending on the version you’re using. If you don’t see it as shown above, look under ‘Forms > (select your form) > Form Settings’.
From this screen you can see all of your PayPal forms.
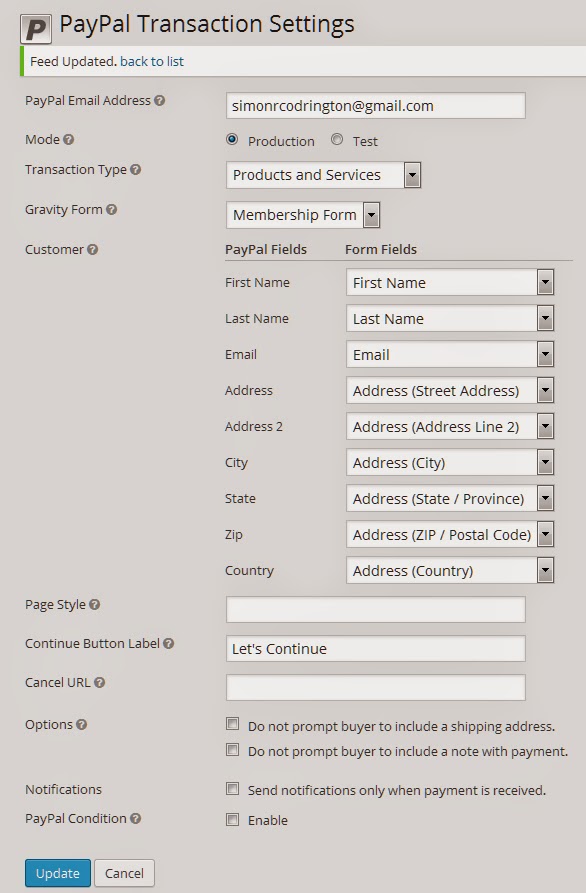
When you add a new payment form you will need to supply the following information:
- PayPal Email Address – Enter the address that will be used to collect your payments
- Mode – Select either production or test
- Transaction Type – Select ‘Products and Services’
- Gravity Form – Select the form that will be associated with this payment. Go ahead and select the form you just created.
- Once selected, you will be shown additional information. This information is related to the PayPal integration and includes mapping your fields to standard PayPal fields, selecting the cancel URL location and other elements. Feel free to complete these if required.
Once completed and saved you should see something similar to below.
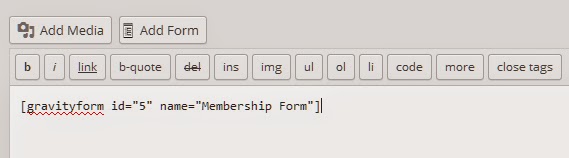
Step 4 – Adding Your Membership Form to a Page
Now that your form is ready, all you will need to do is add this form to a page and test it.
Navigate to the back-end of your website and look for the ‘Pages’ menu item. Create a new page and if you look closely at the visual editor there will be a new button; this button will quickly add your form to your page via a shortcode.
Using Gravity Form’s Hooks and Filters
Once you have successfully set up your form, you should be able to accept payments for this membership system.
The user will enter in their information, process to PayPal, pay for their services and then optionally return to the website (generating notifications all round for everyone).
While Gravity Forms will do all of the heavy lifting, you may need to perform additional actions or functions, depending on what has happened. This is where Gravity Forms becomes very useful as it provides a number of hooks and filters that we can use.
For our membership system we are interested in the payment transaction hooks and filters provided by the PayPal add on. There are several of these that are useful; however for this tutorial we will looking at the gform_paypal_fulfillment hook.
Processing after PayPal Transactions
The main hook we will be using is the gform_paypal_fulfillment hook.
This hook runs once a PayPal transaction has been completed successfully and returns a listing of useful information that we can use in our back-end actions.
This hook should be attached to a function of your choosing, passing the following four variables:
$entry$config$transaction_id$amount
Each of these variables will contain information about your transaction and its data. For this example, we will be pulling all of our form data about this membership and then emailing that information.
First create a function and attach it to this hook as follows:
//function used to hook onto after payments
function membership_payment_processing($entry,$config,$transaction_id,$amount){
        //your post processing to go in here
}
add_action('gform_paypal_fulfillment','membership_payment_processing',10,4);
As a word of warning, be sure to set the ‘priority’ of the hook to 10 and the ‘argument count’ to 4 (as this hook generally wants these to be passed).
Values Inside Of $entry
The new function we have created will trigger as soon as payment has been successfully processed.
We will look into the $entry variable, which contains an array of values for our transaction. The complete listing of values assigned to this array can be viewed on the Gravity forms $entry object, however the main values we will need will be:
form_idpayment_datepayment_status
In addition to these named values, the $entry array will also contain all of the fields completed on your form. These will be structured in a numerical fashion with the key of the field represented by a string. For example '1' or '2'.
In our example, our first field is first name, therefore the value belonging to first name will be stored in $entry with the key name of '1' so we would assign it to a variable as follows:
//assign the first name field to a variable
$first_name = $entry['1']$entry array and then assign them to a string. Once you have done this for all of your values, you can then send yourself an email (so you can easily see the key and its value).
//collect all entry values
function membership_payment_processing($entry,$config,$transaction_id,$amount){
        $message = '';
        foreach($entry as $key=>$value){
                $message .= 'Key: ' . $key . ' Value: ' . $value;
        }
        //send yourself an email (replace the email address below with yours)
        wp_mail('simonrcodrington@gmail.com','Entry Information`,$message);
}
add_action('gform_paypal_fulfillment','membership_payment_processing',10,4);
After this you will be able to determine what key belongs to what values and assign your variables as you need.
Extracting Our Required Information
Let’s move on to our example. For our example, we will be extracting our form fields into variables so that we can store their values. Your code should look similar to the code below (remember to go through a test run first and determine what the corresponding string value will be for your form fields).
//process membership after transaction
function membership_payment_processing($entry,$config,$transaction_id,$amount){
	//first determine if we are processing the correct form
	$form_id = $entry['form_id'];
	if($form_id == 1){

		//collect values values
		$first_name = $entry['1'];
		$last_name = $entry['2'];
		$email = $entry['3'];
		$phone = isset($entry['4']) ? $entry['4'] : '';
		$address_street = $entry['5.1'];
		//notice '5.2' is missing, this is address line 2 we removed from the address configuration
		$address_city = $entry['5.3'];
		$address_state = $entry['5.4'];
		$address_postcode = $entry['5.5'];
		$address_country = $entry['5.6'];
		$membership_type = $entry['6'];
		$total_cost = $amount;
		$transaction_id = $transaction_id;

		//format these values into a message that we can send
		//replace values as required
		$to ='simonrcodrington@gmail.com';
		$subject = 'New Membership Application';

		$header_cell_style = 'background: #ccc; text-align: center; padding: 5px 7px 5px 7px;';
		$cell_style = 'background: #eee; text-align: center; padding: 5px 7px 5px 7px;';

		$message = '';
		$message .= '<h2>New Member Application</h2>';
		$message .= '<p>A new member has successfully been processed</p>';
		$message .= '<table border="1" style="border-collapse: collapse;">';
		$message .='<tr>';
		$message .='<th style="' . $header_cell_style . '"> First name </td>';
		$message .='<th style="' . $header_cell_style . '"> Last name </td>';
		$message .='<th style="' . $header_cell_style . '"> Email </td>';
		$message .='<th style="' . $header_cell_style . '"> Phone </td>';
		$message .='<th style="' . $header_cell_style . '"> Address Street </td>';
		$message .='<th style="' . $header_cell_style . '"> Address City </td>';
		$message .='<th style="' . $header_cell_style . '"> Address State </td>';
		$message .='<th style="' . $header_cell_style . '"> Address Postcode </td>';
		$message .='<th style="' . $header_cell_style . '"> Address Country </td>';
		$message .='<th style="' . $header_cell_style . '"> Membership Type </td>';
		$message .='<th style="' . $header_cell_style . '"> Total Cost </td>';
		$message .='<th style="' . $header_cell_style . '"> Transaction ID </td>';
		$message .='</tr>';
		$message .='<tr>';
		$message .='<td style="' . $cell_style. '">' . $first_name . '</td>';
		$message .='<td style="' . $cell_style. '">' . $last_name . '</td>';
		$message .='<td style="' . $cell_style. '">' . $email . '</td>';
		$message .='<td style="' . $cell_style. '">' . $phone . '</td>';
		$message .='<td style="' . $cell_style. '">' . $address_street . '</td>';
		$message .='<td style="' . $cell_style. '">' . $address_city . '</td>';
		$message .='<td style="' . $cell_style. '">' . $address_state . '</td>';
		$message .='<td style="' . $cell_style. '">' . $address_postcode . '</td>';
		$message .='<td style="' . $cell_style. '">' . $address_country . '</td>';
		$message .='<td style="' . $cell_style. '">' . $membership_type . '</td>';
		$message .='<td style="' . $cell_style. '">' . $total_cost . '</td>';
		$message .='<td style="' . $cell_style. '">' . $transaction_id . '</td>';
		$message .='</tr>';
		$message .= '</table>';

		//add filter to enable HTML messages
		add_filter('wp_mail_content_type','set_email_to_html');

		//send mail
		wp_mail($to,$subject,$message);

		//remove filter (to set back to plain text email)
		remove_filter( 'wp_mail_content_type', 'set_email_to_html' );

	}
}
add_action('gform_paypal_fulfillment','membership_payment_processing',10,4);

//sets the email content type to HTML
function set_email_to_html(){
	return true;
}
If you are interested more in WordPress mail you can click here to view the codex page.
We have hooked onto the gform_paypal_fulfillment hook and determined that the correct form is being collected (in my example it was form 1). Once we know we are on the correct form we collect our form values.
After we have all of our values, we create a simple table structure and populate the content.
We use a filter called wp_mail_content_type. This filter determines if your mail will be sent as plain text or as HTML. We call this filter right before we send our email and then we remove it again afterwards (to ensure we don’t create a conflict).
We send our mail to our desired address and it should be formatted as a basic table (with some styling). You should have something similar depending on your email program.
In Conclusion
Now that you know how to use Gravity Forms and its PayPal add-on to take payments, you can use this as a base to create more complex functionality (without the hassle of manually integrating with a payment gateway).
Frequently Asked Questions about Processing Payments with Gravity Forms
How secure is the payment processing with Gravity Forms?
Gravity Forms is designed with security in mind. It uses secure socket layer (SSL) encryption to protect sensitive data during transmission. Additionally, it does not store credit card information on your server, further enhancing the security of your transactions. However, it’s always recommended to keep your WordPress and Gravity Forms plugins updated to the latest versions for optimal security.
Can I use Gravity Forms for recurring payments?
Yes, Gravity Forms supports recurring payments with the help of add-ons like PayPal, Stripe, and Authorize.Net. These add-ons allow you to set up subscriptions with recurring payments, making it ideal for membership sites, donations, and more.
What payment gateways are compatible with Gravity Forms?
Gravity Forms supports a variety of payment gateways including PayPal, Stripe, Square, and Authorize.Net. This flexibility allows you to choose the payment gateway that best suits your business needs and preferences.
Can I offer discounts or promotional codes with Gravity Forms?
Yes, with the help of the Coupons Add-On, you can create and manage promotional codes that users can apply to their orders. This feature is great for running promotions and attracting new customers.
Can I customize the payment form to match my website’s design?
Absolutely. Gravity Forms offers a range of customization options. You can change the layout, colors, and fonts to match your website’s design. You can also add custom fields to collect additional information from your customers.
Can I track my sales and transactions with Gravity Forms?
Yes, Gravity Forms allows you to track your sales and transactions. With the help of add-ons, you can integrate your forms with analytics tools like Google Analytics to gain insights into your customers’ behavior and improve your sales strategy.
Can I use Gravity Forms for international transactions?
Yes, Gravity Forms supports international transactions. However, the availability of certain payment gateways may vary depending on your location. It’s recommended to check with the payment gateway provider for details.
Can I refund payments through Gravity Forms?
While Gravity Forms itself does not handle refunds, you can issue refunds through the payment gateway you used for the transaction. The process for issuing refunds varies depending on the payment gateway.
Can I test my payment form before going live?
Yes, Gravity Forms allows you to test your payment form before it goes live. Most payment gateways supported by Gravity Forms offer a sandbox or test mode for this purpose.
Can I use Gravity Forms to sell physical products?
Yes, you can use Gravity Forms to sell physical products. You can create product fields, set prices, and even calculate shipping costs. However, Gravity Forms does not manage inventory, so you’ll need to keep track of your stock manually or use an e-commerce plugin that includes inventory management.
 Simon Codrington
Full stack developer and overall web enthusiast. I love everything to do with web / design and my passion revolves around creating awesome websites. Focusing primarily on WordPress, I create themes, plugins and bespoke solutions.


