
In recent months I have been attempting to make as much of my work and creative output as open and collaborative as possible. Since most of my output being code and markdown, this has been relatively simple.
However, I give a lot of presentations about open culture and it seemed a little hypocritical that I was delivering them through closed, non-collaborative software.
Whilst MS Powerpoint has gained competition from applications such as Keynote and Prezi, they are all still closed and only semi-collaborative formats. Crucially, they are all ‘dead-end’ formats, i.e. a powerpoint file, is just a powerpoint file, it can’t be easily re-used or interpretted as a part of anything else. What I mean by this will become clearer later.
I knew there were options available to create a more ‘open’ presentation, generally browser-based format that leverages JavaScript and CSS to recreate the look, feel and effects of those traditional presentation tools.
In addition to simply recreating my existing presentations (from PowerPoint and Keynote) in one a more open format, I had some other requirements to make me satisfied.
What were my motivations?
Write once, re-purpose multiple times
I want to be able to write the same content for a blog post, a presentation and some other purposes and be able to render them in my different use cases.
Shareability
Frequently when I present at a conference the organizers ask for a slide deck afterwards. For some a link may be enough, but for others they want a standalone file, such as a PDF. This allows presentations to be uploaded to services like Slideshare where I get a lot of exposure for my presentations.
Attractiveness
I like to create presentations with full screen images, clear, readable text and other engaging tropes to make people notice. A framework that only supports small format images and text is of no interest to my.
My Framework of Choice
I actually found fewer frameworks than I was expecting and settled on Reveal.JS as it met my prerequisites, as well as offering some other features that I hadn’t even considered, such as presenter view and notes.
It’s worth noting at this point that most of these frameworks are aimed at those with technical knowledge. Some do offer commercial drag-and-drop creation tools, but to leverage their true potential you will need a solid working knowledge of CSS, HTML and (maybe) JavaScript.
Creating Your Presentation
At a basic level, this is a simple process, and we have a good introduction already on SitePoint.
In the default reveal HTML file you will find a <div class="slides"> which can contain multiple section tags, these are your slides. With reveal you can create ‘nested’ slides, or vertical slides that allow for the creation of logical sections in your presentation. These are created by nesting further section tags inside a section tag.
After that, slides are just HTML, with some custom tags and parameters unique to Reveal. If you can code HTML, you can create a presentation and if you can’t, Reveal offers a commercial product just for you, the slides.com service.
So, for the rest of this article I’m going to assume that you can manage coding some basic slides and show you tips and tricks that I have learned in the process of migrating presentations to Reveal.
Full Screen images
Add the following class to your section / slide div:
<section data-background="imagefile">You can then layer other content over this image as normal. There are many options for how the image should display and bear in mind some of the loading options you might need to prevent a progressive image load when switching screens.
Left and Right panels
Often in Powerpoint and Keynote, templates have left and right panels with two different sets of content, an image and text for example. Whilst some would say that using this sort of layout goes against the more fluid design principles of reveal, I think there is still a need for it occasionally. It’s easy to replicate with some basic CSS:
.left-align {
  float:left;
  width:50%;
}

.right-align {
  float:right;
  width:50%;
}

.panel {
  text-align:left;
}

.panel img {
  width:100%;
}
We create a general panel class that aligns text left instead of reveal’s typical centered alignment. We create two classes to set the float and width and make any images that are in a panel fill 100% width. All the above is to personal taste and suited my needs, but you get the idea.
Stretching Images
Whether filling the whole slide or one of the panels we created above, we sometimes want an image to fill the space it occupies proportionally. This is achieved by adding the stretch class to any media, images and media included.
Code
Code highlighting is one of reveal’s standout features, but I still find it limited and have tweaked it. This is due to it’s use of the pre tag which will render exactly as it sees, which means if you’re a code layout obsessive like me, then your code may not render how you want in a presentation.
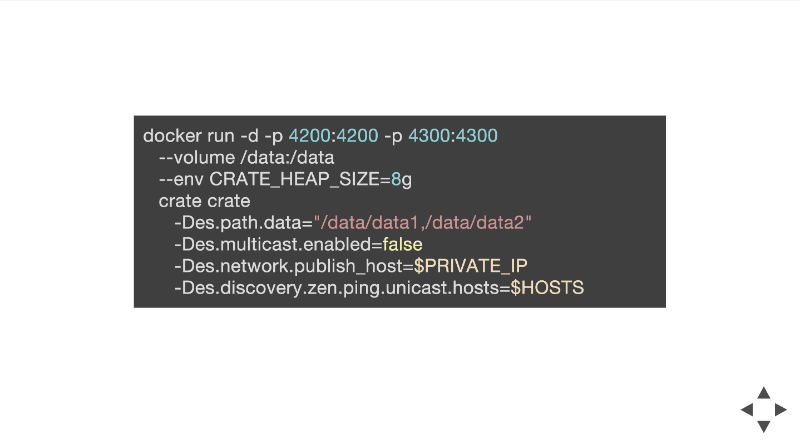
I’ve found I can get more control by using this CSS snippet:
.reveal code {
  white-space: pre-line;
  text-align: left;
}
And then make use of the   tab HTML entity to control tab indents how I want them, i.e.:
docker run -d -p 4200:4200 -p 4300:4300
 --volume /data:/data
 --env CRATE_HEAP_SIZE=8g
 crate crate
  -Des.path.data="/data/data1,/data/data2"
  -Des.multicast.enabled=false
  -Des.network.publish_host=$PRIVATE_IP
  -Des.discovery.zen.ping.unicast.hosts=$HOSTS
I would suggest that you set the code class for that extra fine grained control of how it will display, i.e. for the above I would use <code data-trim class="bash">.
Effects
Animations and effects are limited to slide transitions, animated backgrounds and ‘fragments’, slide elements that can show themselves incrementally. Some may find this a little creatively limiting, but we all know that presentation animations are more often overdone than the opposite.
Using Markdown
I mentioned in my introduction that I wanted to be able to write a my text once and then reuse it for multiple purposes. With Reveal’s Markdown loading and some planning this is (mostly) possible.
To use a Markdown file as the source of your slides you use the following code instead of creating a sequence of section divs:
<section data-markdown="index.md"
            data-separator="\n\n\n"
            data-separator-vertical="\n### "
            data-separator-notes="^Note:"
            data-charset="iso-8859-15">
        </section>
The important parameters above are the separator values. These let you define how the structure of a Markdown file influences the slide construction and this is where the planning comes into play.
In the above example, I have defined three new lines to determine the beginning of a new slide and a level 3 heading to be a vertical slide. This allows me to have a reasonably well structured markdown file for multiple purposes.
Presenting
Speaker Notes
I like to create image heavy presentations, leaving as much text as possible for me to say, instead of for people to read. This means I need notes and value the presenter view found in all presentation software.
Reveal provides much the same by opening up a separate browser window when you hit the ‘s‘ key. This window contains speaker notes for the current slide, the next slide, a timer and an extra set of controls.
In some respects, for presentations that involve demos, reveal is better than ‘normal’ applications as you don’t have to keep switching from full screen applications or finding lost terminal or code windows on extended desktops. Everything can be positioned for where and when you need it.
Overview and Fullscreen Mode
A quick press of the ‘Esc‘ or ‘o‘ key will zoom out into an overview of all the slides in your presentation, great for finding a particular slide, or maybe simulating prezi should you want to. Pressing ‘F‘ will bring your presentation into fullscreen mode, meaning you don’t need to rely on the browser for this, as that can be inconsistent.
Taking your Presentation further
API
Does any other presentation software come with an API?
This API you to undertake all sorts of cool opportunities whilst running your presentation. One simple example might be live-tweeting a link to the current slide. Another might be committing code you’re displaying on screen into a repository and then pushing it when the presentation is complete. Literally creating a demo for people on the spot.
The possibilities are almost endless and if you want to get even more Meta, reveal itself can be controlled by the API.
Plugins
Should you need some extra functionality, reveal has a limited amount of plugins available, but as they’re just JavaScript, you could always create your own.
Export
To fit into my “Write once, repurpose multiple times” strategy, export is an important factor. Reveal’s inbuilt PDF export is a little disappointing, relying solely on a special style sheet and the browser print dialog, worse than that, it’s Chrome / Chromium only.
There are other options available such as using WKHTMLtoPDF or Markdown to PDF via Pandoc and Latex, but they are best saved for another article.
Sticking to the default reveal option, it’s simple to use. Add print-pdf into the query string of the presentation, i.e. ?print-pdf and the presentation will render using reveal’s pdf style sheet (css/print/pdf.css) and you then rely on the print dialogue to export to a PDF. You will find that the default style sheet needs some customizing and I am unsure why this will only work in Chrome if it just uses the system print dialog.
Another option is the DeckTape project that is a PDF exporter for HTML presentation frameworks. I haven’t tried it yet, but it will need some more configuration.
Conclusion
Reveal and other frameworks like it wont be a complete replacement of PowerPoint/Keynote for everyone, but if you’re willing to try something different to open yourself up to new possibilities then they’re easy to get started with.
I’m new to using such frameworks but am enthusiastic about exploring their full potential for integration and workflow optimization. I’d love to the tips, tricks and methods you’ve followed to accomplish the same.
 Chris Ward
Developer Relations, Technical Writing and Editing, (Board) Game Design, Education, Explanation and always more to come. English/Australian living in Berlin, Herzlich Willkommen!