Content Management is one of the most common Web-related issues that confronts organizations today. Everyone agrees that it’s important to keep Website content current and relevant. Information that’s out-of-date reflects poorly on an organization. Content Management Systems allow designated users to maintain and update their respective areas of a site.
Many proprietary Content Management Systems (CMS) can cost between $50,000 to $100,000 — or even more. For this reason, many developers choose to develop their own solutions that will meet their specific needs. I recommend Build Your Own Database Driven Website Using PHP & MySQL as a very practical book for learning more about the different issues involved in this task.
Whichever CMS solution you use, there must be some way for the user to format the content they submit to update the Website. There are several options, one of which is to teach each user basic HTML tags. This approach is cumbersome, does not scale well, and invites code errors and other problems. Another option is to programmatically format the submitted content (which is dealt with in chapter 7 of the book mentioned above).
However, the best solution is to use a replacement for the TEXTAREA tag. Ideally, the solution will offer the end-user a familiar environment that would be similar to a word processor, and will allow the user to format text (or other content) using the point-and-click method.
What’s on the Agenda?
This tutorial charts the progress of a project I was recently involved in, as Webmaster at my local community college. First, I’ll explain the college’s needs, and the criteria we used to assess each solution we considered. Next, I’ll show you how to integrate the solution we chose into your own site. And finally, I’ll explain how to embed the solution into your site’s CMS.
A Case Study
The college was in need of a way to allow individual team members to update certain pages of the site on a daily basis, on short notice. Rather than have users continually submit these small, detailed changes to the Webmaster, it made more sense to provide a way for each individual who had responsibility for a particular area of the site to be able to make the changes themselves.
As many team members were not technically-trained, I knew that a replacement for the TEXTAREA tag was needed to provide these users with an effective and user-friendly interface through which they could submit their content changes.
Some solutions on the market at the time were only available for ASP, and were therefore not an option, as the server used by the college only supported PHP. Other solutions involved licensing structures that would become rather expensive as more team members began to use the system — a fact that negated the benefits to be gained through distributed authoring and publishing.
Often, products that claimed to be easy to use required explanation through weighty instruction manuals. The community college didn’t want the hassle of providing extensive training for staff. They wanted an inexpensive, easy solution.
My research eventually lead me to Editize. This product was an obvious winner, in that it was inexpensive and supported a variety of scripting languages including PHP. The licensing was also very flexible (as a matter of fact, the initial cost of $149 includes an unlimited number of end-users). And to my surprise, Editize was truly easy to use.
The Editize User Interface
As you can see below, Editize loads directly into the Web page (as an applet), and provides the end-user with a comfortable word-processor type environment. Editize also gave me, as the site’s Webmaster, complete control over the editing features I was comfortable to give the CMS’s users. Each feature can be disabled if I so desire.
Editize offers a full complement of editing features:
- Paragraph styles
- Paragraph alignment
- Bulleted and numbered lists
- Bold, italic, and underlined text
- Configurable higlighted text color for key words and phrases
- Inline code display in technical articles in a mono-spaced font
- Full support for hyperlinks (with pre-configurable URLs)
- Full support for images
- Insert and modify images
- Insert and edit tables
- Tabbed WYSIWYG/Code view interface for advanced users
A key advantage of incorporating Editize into your Content Management System is that the “look and feel” of your site is protected, while users are given just enough freedom to edit and format predefined areas within given Web pages. For example, Editize’s “highlighted text” option can be controlled by a CSS setting that forces highlighted text to be set to a predefined color.
So far, so good. I liked what I saw, so I decided to give Editize a try.
Implementation
Step 1 – Download the software
A free trial version of the software is available at www.editize.com/download.php, and downloading the software was certainly no problem.
This is worth mentioning, because some software vendors allow only a single download, and if for some reason the download is unsuccessful, you end up having to call the company, etc. This is not the case with Editize. If for some reason, you need to repeat the download, or you’d like to download the newest version of the software, it’s a hassle-free process. Simply sign on to the member area, and download the software.
Step 2 – Copy the files to your server
Create a folder on your server for the Editize files, such as http://www.yoursite.com/editize/, and upload the files to that folder. Here’s a description of the files included in the download:
- editize.jar – The Editize Java library file. This contains the Editize applet.
- editize.php – The Editize API for PHP. This PHP library will generate the HTML and JavaScript code necessary to display the Editize applet on almost any browser or operating system.
- kunststoff.jar – The Kunststoff Look & Feel. Improves the look of the Editize user interface dramatically, but adds 43KB of Java files for users’ browsers to download the first time they visit your site. If you delete this file, Editize will simply run without any visual enhancements, and will load slightly faster over slow modem connections.
- osx.html – A small Web page containing JavaScript that allows Editize to behave like a form field on Mac OS X browsers.
- index.php – A sample PHP script that demonstrates how to create Editize form fields compatible with most browsers.*
- index-mac.php – A sample PHP script that demonstrates how to create Editize form fields compatible with most browsers, including Internet Explorer and Mozilla on Mac OS 10.1.*
- imglist.php – A sample PHP script that will list the images in a given directory of your Web server for Editize to use as an image list.*
Step 3 – Copy the license file to the server
This file will be called editize.hostname.lic Put this file in the same folder as the others.
Step 4 – Integrate Editize into your update pages
Any page that uses Editize must know where to find it. Providing those directions is as simple as adding this line to any page that uses Editize:
<?php require('path/to/editize.php'); ?>This line will point to the editize.php file in the folder you created earlier. Then, the following code will be used, instead of a typical HTML form.
<form action="..." method="post">

<?php

$ed = new Editize;

$ed->name = 'example';

$ed->display('<p align="center">This is the document that

Editize will edit.</p>');

?>

<input type="submit" value="Submit" />

</form>
The instructions that are available with the Editize download include more information on setting the configuration attributes, plus a few other tweaks. And of course, the instructions will vary slightly if you’re using ASP or another scripting language. All the instructions are well-written, straightforward, and easy to understand, so you won’t have any problem following them to customize the system to your needs.
Results
- The end result was a very slick looking interface that end users were very comfortable using. Editize provided them with a very familiar point-and-click environment similar to most word processing software, so users had no trouble updating site content.
- There was much less work involved from a development standpoint, due to the fact that Editize was an out-of-the box solution. Thus, I could avoid having to deal with an assortment of formatting issues in the php code.
- The separation of design from user-submitted content ensured a more consistent and professional-looking site.
- End-users required little or no training.
- The initial investment was minimal.
The trial had been successful! The site managers were happy, and the team members I’d asked to trial the software really enjoyed using it. The community college decided to go ahead and integrate the product with its CMS.
Utilizing Editize Within a Content Management System
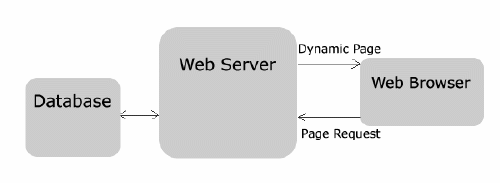
The fundamental idea behind using Editize is to allow the end user to format their content, and submit that content for storage in a database. Rather than updating static Web pages, Editize updates the database, thereby automatically updating every page that uses that particular data.
Whenever a user requests a given page, the Web server retrieves the appropriate data from the database, and inserts it into the Web page before returning the page to the user. The resulting Web page will then display the nicely formatted content. This interaction is briefly summarized in the graphic below:
The Data
There are many types of data that could be stored in, and many features that are common to, Content Management Systems. In general, the more often the data changes, the more suited it is for inclusion in the system.
For the purpose of this tutorial, we’ll examine a very simple system that could be used to update the main content area of a Web page, and display the date on which the page was last updated.
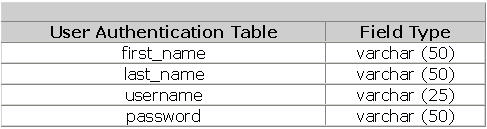
In order to restrict this process to authorized users, we’ll include a database-driven user authentication system.
Our user authentication table contains 4 fields:
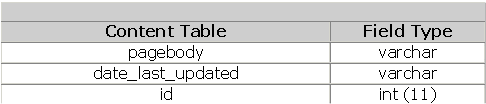
The content will be stored in a content table with these fields:
The User Login Page
The user login page Looks like this:
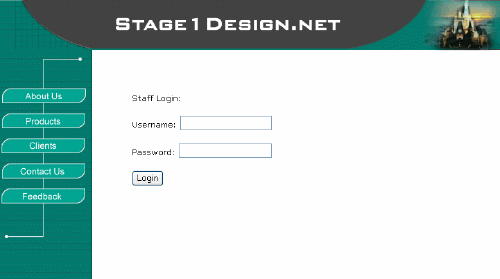
First, we need to create a page that allows the user to sign in, and gain access to the administration page. The following PHP code is an example of such a page. Please note that this code submits the data to a page called authuser.php:
<HTML>

<HEAD>

<TITLE>Login</TITLE>

</HEAD>

<BODY>

<H1>Login to Secret Area</H1>

<FORM METHOD="post" ACTION="authuser.php">

<P><STRONG>Username:</STRONG><BR>

<INPUT TYPE="text" NAME="username"

SIZE=25 MAXLENGTH=25></p>

<P><STRONG>Password:</STRONG><BR>

<INPUT TYPE="text" NAME="password"

SIZE=25 MAXLENGTH=25></p>


<P><INPUT TYPE="SUBMIT" NAME="submit"

VALUE="Login"></P>


</FORM>

</BODY>

</HTML>
The Validation Page
Once the user submits the data, authuser.php will validate the information according to the values stored in the authuser (user authentication) database table. authuser.php is listed below:
<?

if ((!$username) || (!$password)) {

header("Location: http://localhost/login.html");

exit;

}

//The code above will check to make sure the username

and password were not left blank, if either are blank

the user will be sent back to the login page.


$db_name = "testDB";

$table_name = "authuser";

$connection = @mysql_connect("localhost", "baggins",

"adventure")

or die("Couldn't connect.");

$db = mysql_select_db($db_name, $connection)

or die("Couldn't select database.");

$sql = "SELECT * FROM $table_name

WHERE username = "$username" AND password =

password("$password")

";

$result = mysql_query($sql)

or die ("Can't execute query.");

$num = mysql_numrows($result);

if ($num != 0) {

// Since $num holds the number of returned rows, we

know that a match was found if it is not = 0 and we

then set a cookie for the authorized user.


$cookie_name = "authorize";

$cookie_value = "ok";

$cookie_expire = "";

$cookie_domain = "";


setcookie($cookie_name, $cookie_value, $cookie_expire,

"/" , $cookie_domain, 0);

// This cookie will be valid for the browser session


$display_area = "

<p><strong>Secret Menu:</strong></p>

<ul>

<li><a href="secret_page1.php">secret page 1</a>

<li><a href="secret_page2.php">secret page 2</a>

</ul>

";

// * Note that you could also display a different

menu depending on which user signed in.


} else {

header("Location: http://localhost/login.html");

exit;

}

?>

<HTML>

<HEAD>

<TITLE>Secret Area</TITLE>

</HEAD>

<BODY>

<? echo "$display_area"; ?>

</BODY>

</HTML>
The Menu Selection Page
On the page generated by the code above, the user will be able to select the page they’d like to edit:
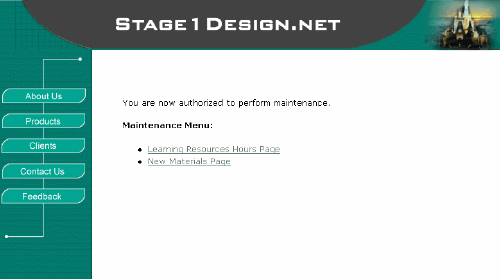
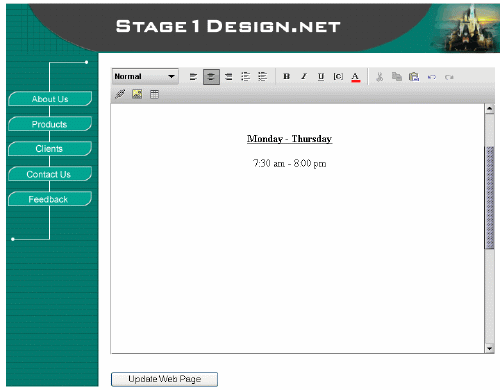
Editize Page
Upon making their selection the user will be presented with the Editize page, where they may easily edit and format their content using the built-in capabilities provided by the Editize applet.

The code for this content editing page is as follows:
<?php require('editize.php'); ?>


<?

if ($auth == "authorize") {

$msg = "<p>You may now perform updates</p>";

} else {

header("Location: http://localhost/login.htm");

exit;

}

mysql_connect('localhost','baggins','adventure');

mysql_select_db('content');

$sql_result = mysql_query("SELECT pagebody FROM

content WHERE id = 20");

$content = mysql_fetch_array($sql_result);

$pagecontent = $content["pagebody"];

?>

<HTML>

<HEAD>

<TITLE>Your Update Page</TITLE>

</HEAD>

<BODY>

<form name="form1" method="post" action="update.php">

// Note that the form submits the data to update.php

The following code loads the Editize applet, and

is used to replace the textarea tag. The applet

is also set here to initially display the old content

(stored in $pagecontent) which is to be updated.


<?php

$ed = new Editize;

$ed->name = 'pagecontent';

$ed->display("<p align="center">$pagecontent</p>");

?>

<input type="submit" name="Submit" value="Update Record">

</form>

</BODY>

</HTML>
The Database Update Page
When the user finishes editing the content, they will submit the data. The form is submitted to the file update.phpm which updates the content database. Let’s see how:
<?

if (!$pagecontent) {

header( "Location: http://localhost/folder/update.php");

exit;

}

$db_name = "content";

$table_name = "content";

$cnx = @mysql_connect("localhost", "bilbo", "adventure")

or die("Couldn't connect.");

$db = @mysql_select_db($db_name, $cnx) or die("Couldn't

select database.");

$dateupdated = date("l dS M. Y h:i a");

mysql_query("UPDATE content SET pagebody = '$pagecontent'

lastupdated = '$dateupdated' WHERE id = 20");

// The code above will update the database with

the newly submitted content and also capture the

current date and time and store it in the variable

$dateupdated which will also be stored in the

database and eventually displayed on the final page.


?>

<HTML>

<HEAD>

<TITLE>Update Record</TITLE>

</HEAD>

<BODY>

<h3>Your page has been updated.</h3>

<P><a href="updated_page.php">View changes here</a></P>

// The above option lets the user view the page

they have just updated

</BODY>

</HTML>
Dynamic Content Page
So, how does our formatted content appear on the Website? The following is an example of a dynamic page that might use the newly formatted data (now stored in the database):
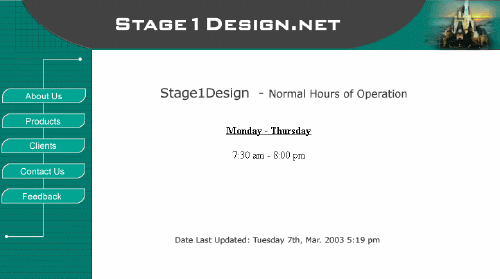
The code for the above page is:
<HTML>
<HEAD>
<TITLE>Dynamic Content Page</TITLE>
</HEAD>
<h3>Dynamic Content Page</h3>
<?php
mysql_connect('localhost','baggins','adventure');
mysql_select_db('contentdb');
$sql_result = mysql_query("SELECT pagebody, lastupdated
FROM content WHERE id = 20");
$content = mysql_fetch_array($sql_result);
$pagecontent = $content["pagebody"];
$displaydate = $content["lastupdated"];
echo "$pagecontent" ;
echo "<p> </p>";
echo "<p>Date Last Updated: $displaydate</p>" ;
?>
</BODY>
</HTML>It’s that easy! Creating an interface for your CMS that allows users to easily format the content they’ve submitted is a cinch witn Editize! Good luck with your site’s CMS.
 Alan Peavey
Alan is a graduate of Southwest Missouri State University, with a degree in Computer Information Systems. In addition to freelance Internet Consulting, Alan also works as an adjunct instructor at Ozarks Technical Community College.