In this article I will explain how Flash Panels fit into the grand scheme of extending Flash MX 2004. We’ll also discuss some of the benefits and pitfalls you may encounter when using Flash Panels in your day to day work.
Through this tutorial, you’ll create your very own Flash Panel to control the rotation of Movie Clips on the stage using standard Flash MX 2004 components, a hefty sprinkling of ActionScript and some tips and tricks along the way. I hope you’ll come away from this tutorial feeling empowered to create your own Flash Panels, and to explore the capabilities and possibilities of Flash MX 2004 — and your own mind!
Before we set out on this extensibility trip, let me point out a couple of resources that will be invaluable in your pursuit of Flash Panel excellence:
- Flash MX 2004 JavaScript Dictionary: An invaluable bible that contains nearly all the Flash API information that you’ll ever need.
- JSFL File API (Not included in the Flash MX 2004 JavaScript Dictionary; functionality added in Flash MX 2004 7.2 udpater).
The creation of Flash Panels for use in Flash MX 2004 basically hinges around the understanding and use of the JSAPI (JavaScript API). It’s based on a Document Object Model (DOM), which allows both Flash Documents and the internal functions of Flash MX 2004 to be accessed via simple JavaScript-based commands.
Since the release of Flash MX 2004, many JSFL (Flash JavaScript) commands, Flash Panels and custom tools have been created to help automate tasks and add custom interfaces to complex controls that directly influence feedback in the Flash authoring environment. Some of these can be found in SitePoint’s Flash Blog; others are easily found via search (use ‘JSFL commands’ or ‘Flash Panels’ as your keywords).
If you’re comfortable with ActionScript, pushing the boundaries to develop your own custom commands and panels is hardly a leap of faith — it’s a small step forward. As the JSAPI is based around the Netscape JavaScript API and Flash’s Document Object Model, developing and writing Flash JavaScript should be a natural progression.
By their very nature, Flash Panels are exported SWF files. However, they’re subtly different from the standard JSFL files that are used to create commands, as they utilise a wrapper function called MMExecute(). This allows interaction between the compiled SWF and the Flash MX 2004 API.
Consider the following line of JSFL, which returns the current width of the first selected item on the stage:
var objectWidth= fl.getDocumentDOM().selection[0].width;In order to gain the same functionality within your SWF Panel, this code needs to be changed as follows:
var objectWidth=MMExecute("fl.getDocumentDOM().selection[0].width");If we examine the code contained within the MMExecute("JavaScript String"), we’ll note that it’s exactly the same piece of Flash JavaScript we saw above. The only difference is that it’s now encapsulated within the wrapper. The MMExecute() function takes the Flash JavaScript string as a single argument and passes it to the Flash API. It’s then processed and a return value is optionally given. This value can then be assigned to a variable.
Flash Panel Location
All the major Flash Panels can be found in one simple location within the authoring environment. Simply select ‘Window > Other Panels >’ to access it in Flash MX 2004.
When you’re creating Flash Panels and testing in the live environment, keep the following locations in mind. These are the folders in which Flash MX 2004 locates the custom panels:
Windows 2000 or Windows XP
Drive:Documents and SettingsuserLocal SettingsApplication DataMacromediaFlash MX 2004languageConfigurationWindowSWF
Windows 98
Drive:WindowsApplication DataMacromediaFlash MX 2004languageConfigurationWindowSWF
Mac OS X
Drive:/Users/userName/Library/Application Support/Macromedia/Flash MX 2004/language/Configuration/WindowSWF
We will make use of these directory locations later, when we test and deploy the extension.
Inspiration
Sometimes when you’re working, you suddenly think ‘Gee, wouldn’t it be quicker if I could automate [Insert Task Here]?’ More often than not, the answer is usually, ‘Yep, it’d be great to automate that task …but how on earth do I do it?’
Enter: Flash Panels… Actually, it’s not just the automation of tasks that warrants the creation of Flash Panels; the need for can stem from any of the following (and some other) requirements:
- Automation: Automate often laborious and time consuming tasks within Flash MX 2004 (Code Addition, Timeline Effects)
- Speedier Access: Quicker access to menu hidden commands
- GUI Control: Add a GUI to control real-time effects (rotation, scaling, position etc)
The creation of a Flash Panel can be a daunting task, which is why you need a clear goal for the panel before you begin. Once you decide specifically what you want the panel to do, you’re already most of the way to creating the panel (apart from the obvious coding and hooking into the interface).
The next step is to sketch the process flow of the command (how it all works) either on paper, or in a text editor of your choice.
Note: when I’m working in Flash, I always keep next to me a notebook that’s dedicated to ideas/workarounds. Sometimes, as you’re working away, a need or idea will spring into your mind that you can automate, speed up, or add an interface to, in order to make your life — and those of your colleagues — easier. Keep a list of these ideas so that those fleeting thoughts are never lost and everyone may benefit from the creation of your time-saving panel!
In the example that we’re about to create, we will use a single instance of the NumericStepper component to control the rotation of Movie Clips. Consider the following diagram, which shows the command process flow of the command we’re about to create in Flash MX 2004:
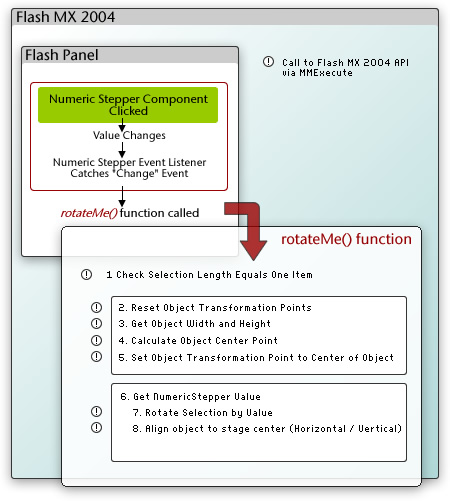
To this, we’ll add a change event handler to catch when the value of the NumericStepper component increases or decreases. When the value changes, the event handler will trigger a function called rotateMe(), which contains all the Flash JavaScript encapsulated in the MMExecute() wrapper function, which is necessary for the function to carry out its given task.
Anyone for a History Lesson?
The History Panel (Window > Other Panels > History), can be a useful insight into the inner workings of Flash MX 2004. When you’re looking to recreate an effect via scripted methods, the History Panel can be a good place to start.
During the majority of your user interaction with the application on the stage, if you have the History Panel open, you’ll notice events appearing within it. This is a visual representation of the communication history between you the user and the application in JSFL.
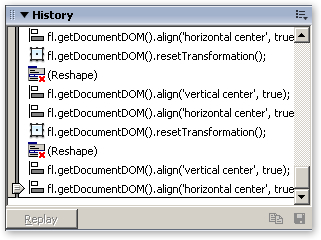
The majority of elements within the history can be copied to the clipboard and pasted into your favourite text editor for investigation, except those beside which a red cross appears.
If you’re trying to identify the relevant API reference to carry out a given stage-based task that you’re trying to automate, and you can’t find it within the Flash MX 2004 JavaScript Dictionary, execute the task on the stage, and simply copy and paste from the History Panel. It makes an excellent starting point for your own custom commands!
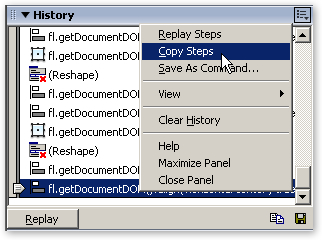
You may also save selected steps (but not those denoted with a red ‘x’) as a command, which will be made available from the ‘Commands’ menu provided it doesn’t require any user interaction. The process of creating one-time commands complete with interfaces is another topic — we’ll come back to it in another article.
Creation
Enough with the introduction! Let’s dive into creating a command that rotates the Movie Clips.
Create the Rotator Flash Panel
I’ve provided the code for the panel in this article’s downloadable code archive. The RotatorStart.fla contains the timeline layer structure and the background image for the panel. The finished FLA for this example is called RotatorFinal.fla.
If at any time you need to look up the process flow for the function, refer to the diagram shown above.
Setting the Scene
Our first course of action is to add the component that will control the effect; as the background and layers have already been set up, we need only to add a single component to the stage before we insert the controlling ActionScript.
Of course, it goes without saying that the more complex the panel, the more controls you may have on screen at any one time. I’ll leave it to you to experiment with your own creations after you’ve created this simple but effective example.
- Open the starting point FLA (RotatorStart.fla from the code archive) and drag an instance of the NumericStepper Component from the ‘UI Components’ section of the Components Panel onto the first frame of the ‘Interface’ layer. Name the instance stepSizer.
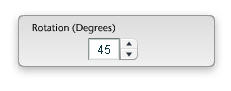
- Position the NumericStepper component instance centrally over the rounded rectangle background, and change the default parameter values to the following:
- Maximum: 360
- Minimum: 0
- stepSize: 5
- Value: 45
- Save your Flash Document to a location of your choice.
- Copy the JXLFLAPI.as file from the code archive to the location of your saved FLA. (this is a JSFL Wrapper that’s used to simplify some tasks).
Now that we’ve created the interface, we need to add the controlling ActionScript to bring the effect to life.
Add the ActionScript
It’s pretty obvious, but the more things that your panel tries to accomplish, the more complex both the ActionScript and the encapsulated JSFL becomes.
In this example, the code is pretty simple and linear, but as you create your own Flash Panels and begin to extend Flash MX 2004, things can get a little more complex. For this reason, it’s often extremely helpful to sketch out the data flow of your command, as I mentioned earlier. You won’t regret it!
//Stage Controls

Stage.align = "TC";

Stage.scaleMode = "noScale";

Stage.showMenu = false;

//Flash API Wrapper (Courtesy Jesse Warden)

#include "JXLFLAPI.as"

//Main Rotation Function

function rotateMe()

{

  var selectionChecker = MMExecute("fl.getDocumentDOM().selection.length");

  if (selectionChecker == 1)

  {

    //Reset Transformation Points to allow easy rotation

    MMExecute("fl.getDocumentDOM().resetTransformation()");

    //Get Selection Width and Height

    var objectWidth =  MMExecute("fl.getDocumentDOM().selection[0].width");

    var objectHeight = MMExecute("fl.getDocumentDOM().selection[0].height");

    //Calculate Center Points

    var objCenterHorz = int(objectWidth / 2);

    var objCenterVert = int(objectHeight / 2);

    //Move Transformation Point to Dead Center (Helps when rotating)

    MMExecute("fl.getDocumentDOM().setTransformationPoint({x:" + Math.floor(objCenterHorz) + ", y:" + Math.floor(objCenterVert) + "})");

    //Get Rotation Value

    var incrementer = stepSizer.value;

    //Rotate Selection

    MMExecute("fl.getDocumentDOM().rotateSelection(" + incrementer + ")");

    //Align H/V to Center of Stage

    MMExecute("fl.getDocumentDOM().align('vertical center', true)");

    MMExecute("fl.getDocumentDOM().align('horizontal center', true)");

    //Update Preview Information

  } else

  {

    break;

  }

}

//==========================

//Miscellaneous Functions

//==========================

//Middle Mouse Wheel Support

//==========================

var mouseListener:Object = new Object();

mouseListener.onMouseWheel = function(delta)

{

  stepSizer.value += delta;

};

Mouse.addListener(mouseListener);

//==========================

//Create Event Handler / Dispatcher for Numeric Stepper

//==========================

stepsListener = new Object();

stepsListener.change = function()

{

  rotateMe();

};

stepSizer.addEventListener("change", stepsListener);

//Numeric Stepper Event Handler Ends
Let’s step through the code and see how it fits together. First, we set the main stage settings, aligning the contents of the stage to TC (Top Centre). We switch off the ability to zoom in, and stop the right click menu from appearing.
//Stage Controls

Stage.align = "TC";

Stage.scaleMode = "noScale";

Stage.showMenu = false;
We then include a nifty JSFL wrapper from Jesse Warden , which allows us to encapsulate some flavours of JSFL without needing to worry about sometimes complex single and double escape strings in the MMExecute() function.
#include "JXLFLAPI.as"Note: Using the JSFL wrapper, we can simplify the following trace statement:
MMExecute("fl.trace("Tracing to the Output Panel")");

The JSFL wrapper simplifies the code as follows:

flapi.trace("Tracing to the Output Panel")
Moving on through the process flow of the panel, we must consider the listener object for the NumericStepper component instance that we have on the stage. We use the change event so that, when the user clicks the up or down controllers of the NumericStepper, the rotateMe() function is called:
stepsListener = new Object();

stepsListener.change = function() {

  rotateMe();

};

stepSizer.addEventListener("change", stepsListener);
The rotateMe() function is called every time the listener object detects that the selected value of the NumericStepper component has changed. If we refer to the previous process flow diagram, we can see clearly the chain of events that occurs.
First of all, we check that the user has selected only a single item from the stage:
var selectionChecker =       MMExecute("fl.getDocumentDOM().selection.length");

if (selectionChecker == 1) {
We then reset the transformation point of the object to a central location. The reason for this is simple: when we rotate the object, it rotates around this transformation point. If the transformation point is off-centre, it can be difficult to gauge what’s going on. Resetting the transformation point to the centre point of the object using the object’s width and height makes the rotation easier to observe and keeps things tidy.
//Reset Transformation Points to allow easy rotation

MMExecute("fl.getDocumentDOM().resetTransformation()");

//Get Selection Width and Height

var objectWidth =

    MMExecute("fl.getDocumentDOM().selection[0].width");

var objectHeight =     MMExecute("fl.getDocumentDOM().selection[0].height");


//Calculate Center Points

var objCenterHorz = int(objectWidth/2);

var objCenterVert = int(objectHeight/2);

//Move Transformation Point to Dead Center (Helps when rotating)


MMExecute("fl.getDocumentDOM().setTransformationPoint({x:"+Math.floor(objCenterHorz)+", y:"+Math.floor(objCenterVert)+"})");
We then get the current value of the NumericStepper Component, store it in the incrementer variable, and rotate the selection accordingly using rotateSelection(value). As the NumericStepper component facilitates the use of continuous feedback by holding down the direction buttons, this can lead to a pleasing and functional effect.
//Get Rotation Value

var incrementer = stepSizer.value;

//Rotate Selection

MMExecute("fl.getDocumentDOM().rotateSelection("+incrementer+")");
Finally, we align the object centrally to the stage while rotating it. It’s a personal choice of mine to add this code. If it’s omitted, the object can drift as a result of the way Flash MX 2004 applies the centralised transformation point (see the earlier discussion).
//Align H/V to Center of Stage

MMExecute("fl.getDocumentDOM().align('vertical center', true)");

MMExecute("fl.getDocumentDOM().align('horizontal center', true)");
That’s all we need to do in order to rotate the selected object; however, there’s an additional snippet of ActionScript that will give the Flash Panel middle mouse wheel support. This allows us to increase or decrease the value of the rotation either by clicking on the up and down arrows, or by scrolling the mouse wheel up or down. This utilises the same methodology as the event handler for the NumericStepper component, but uses the onMouseWheel event handler to increase or decrease the component’s value.
var mouseListener:Object = new Object();

mouseListener.onMouseWheel = function(delta) {  stepSizer.value += delta;

};

Mouse.addListener(mouseListener);
Windows 2000 or Windows XP
Drive:Documents and SettingsuserLocal SettingsApplication DataMacromediaFlash MX 2004languageConfigurationWindowSWF
Windows 98
Drive:WindowsApplication DataMacromediaFlash MX 2004languageConfigurationWindowSWF
Mac OS X
Drive:/Users/userName/Library/Application Support/Macromedia/Flash MX 2004/language/Configuration/WindowSWF
To use the command, simply select a single object from the stage, then use the controls within the Flash panel to control rotation of the object. Now you have a fully functional Flash Panel that controls the rotation of your object in a quick, defined and timely manner!
Note: I usually use the Flash JSFL Wrapper to trace out information to the Output Panel during the development phase. For example, if in this case, I wanted to trace out the current value of the NumericStepper component when middle mouse wheel was scrolled, I would add to our code the lines denoted in bold.
var mouseListener:Object = new Object();

mouseListener.onMouseWheel = function(delta) {

  flapi.trace("Object rotation is now "+stepSizer.value+ " degrees");

  stepSizer.value += delta;

};
Note also that there are a couple of extra functions I’ve included at the end of this article to help you on your way!
Now all that remains is to package the SWF into a manageable MXP file that can be installed onto your machine, or computers of your colleagues or anyone that you wish!
Implementation
Before we package the Flash Panel into a distributable format, there are a couple of ‘gotchas’ that we need to examine!
Updating the Panel while still in Flash MX 2004
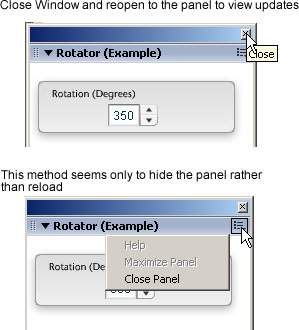
When you make changes to the interface of, or add code to, your Flash Panel projects, you will obviously need to export your updated SWF to the ‘WindowSWF’ folder. However, in order to see the updates, you’ll need to close the panel by clicking the window ‘x’ button when the panel is undocked and reopen it from the ‘Window > Other Panels >’ menu, rather than selecting ‘Close Panel’ from the Options flyout. The reasoning behind this is that clicking the ‘Close Panel’ option seems merely to hide the panel from view, rather than properly closing it and releasing it from memory.
Name the Exported SWF
I’ve experienced several ‘Name Clash’ issues when developing extensions for Flash MX 2004, and they can be slightly irritating — to say the least! Sometimes, when you export a SWF to the ‘WindowSWF’ directory and attempt to open the panel within Flash MX 2004, a different panel opens!
There is apparently no workaround for this — you simply have to change the name of the SWF until it opens the correct panel when you select the panel from Window > Other Panels > [Your Panel]. To me, it looks like Flash MX 2004’s built-in directory parsing uses a simple regular expression to iterate through the directory, and it can easily get confused! Hopefully, this will be rectified in the next minor (or major) release of Flash MX 2004.
Package your Panel
In order to make your shiny new panel easily shareable, you need to create an MXP file that can be installed with the Macromedia Extension Manager. The first step is to create an MXI file that the Extension Manager can use to compile the MXP file. The MXI is essentially an XML file that contains simple information about the extension: version information, extension name and description, as well as the files to compile.
Note that an example .mxi file is included within the article source code, so you can alter it for your needs.
Although it’s outside the scope of this article to describe all the options available to those creating distributable MXPs, I’ll cover some of the basics here to get you started.
In order to create an MXI file for the Flash Panel we’ve just created, open your favourite text editor and add the following:
<?xml version="1.0" encoding="UTF-8"?>

<macromedia-extension

   name="Rotator Panel for Flash MX 2004"

   version="1.0.1"

   type="Command"

   requires-restart="true">

  <author name="Phireworx" />

  <products>

    <product name="Flash" version="7" primary="true" />

  </products>

  <description>

  <![CDATA[

  Happily rotate your objects in Flash MX 2004 using this Simple     Panel

  ]]>

  </description>

  <ui-access>

  <![CDATA[

  Access to the command panel is by selecting 'Window > Other Panels     > Rotator Panel' in Flash MX 2004.


  ]]>

  </ui-access>


  <license-agreement>

  <![CDATA[

  ]]>

  </license-agreement>

  <files>

  <file source="Rotator Panel.swf" destination="$flash/WindowSWF" />

  </files>

</macromedia-extension>
The MXI file contains different information, all of which can be easily understood and edited to suit your own needs. Here’s a quick overview of where the information is located:
- Author Name: within the
<author>tag name attribute - Description: within the
<description>tag - Access and Usage Instructions: within the
<UI-access>tag - Source File: within the
<file>tag source attribute - File Destination: the location at which you should install the file is within the
<file>tag destination attribute
The most important section is the name of the SWF file that we are going to add:
<file source="Rotator Panel.swf" destination="$flash/WindowSWF" />We simply place the name of the exported SWF into the ‘file source’ section, and add the ‘WindowSWF’ directory as the destination ($flash/WindowSWF).
Note that the name of the exported SWF file that you include within the extension will appear as it does in the Flash MX 2004 menu system under ‘Other Panels’.
Once you’ve edited the options to your needs, save the file with the extension .mxi (e.g. Rotator Panel;.mxi).
Now, you can double-click the MXI file, and (if Macromedia Extension Manager is installed), you’ll be prompted for an extension (MXI) to package. You’ll also be asked for a name by which the extension package (MXP) can be saved. The Macromedia Extension Manager automatically creates the MXP file, which can then be distributed as you see fit!
I’ve only skimmed the surface of creating your own custom Flash Panels in this article, but I certainly hope that this information has given you the incentive to create your own Flash Panels! If you do create any exciting Flash Panels, you can always share them with the SitePoint community by posting in the Flash forums.
Don’t be afraid to experiment with your own cool effects and ideas for panels and commands. I’ll see you in the forums!
Extra Functions
Here are a few of extra functions to help you on your way with the development of Flash Panels.
Show an Alert
When called from a compiled SWF, this simple piece of code will produce an alert within Flash MX 2004.
errMsg = "alert('Please Save Your FLA before Applying the Effect');";

MMExecute(errMsg);
Check the File is Saved
This next section of code will check to see whether the current document has been saved or not, and carries out a conditional function:
function checkDocumentIsSaved() {

  var fileDestinationTemp = MMExecute("fl.getDocumentDOM().path");

  if (fileDestinationTemp != "undefined") {

    //Document is Saved, do something

  } else {

    //Document is NOT Saved, do something

  }

}
Iterate Through Selected Stage Objects
This simple code will iterate through an array of currently selected objects on the stage. This can be extremely useful to change en masse properties of groups of selected objects:
var objLength = MMExecute("fl.getDocumentDOM().selection.length");

  for (var i = 0; i<objLength; i++)

      {

      //Do Something to the selected object here

      flapi.trace(i);

      }
Frequently Asked Questions about Flash Panels
What are the key features of flash panels?
Flash panels are versatile and offer a range of features that make them a popular choice for many applications. They are lightweight, making them easy to handle and install. They are also highly customizable, allowing for a variety of shapes, sizes, and colors. Flash panels are also known for their durability and resistance to weather conditions, making them suitable for both indoor and outdoor use. They are also energy-efficient, helping to reduce energy costs.
How do I install flash panels?
The installation process for flash panels can vary depending on the specific product and application. However, the general process involves preparing the surface, applying adhesive, positioning the panel, and securing it in place. It’s important to follow the manufacturer’s instructions to ensure a successful installation.
Can I customize my flash panels?
Yes, flash panels are highly customizable. They can be cut to fit specific dimensions, and they come in a variety of colors and finishes. Some manufacturers also offer custom printing options, allowing you to add logos, graphics, or other designs to your panels.
Are flash panels energy efficient?
Flash panels are known for their energy efficiency. They have excellent insulation properties, helping to reduce heat loss and keep energy costs down. Some panels also have reflective surfaces, which can help to maximize natural light and reduce the need for artificial lighting.
How do I maintain my flash panels?
Flash panels are designed to be low maintenance. They can be easily cleaned with a soft cloth and mild detergent. It’s also important to inspect your panels regularly for any signs of damage or wear and tear, and to repair or replace panels as necessary.
Are flash panels durable?
Yes, flash panels are highly durable. They are resistant to weather conditions, impact, and UV radiation. They are also non-corrosive and can withstand a wide range of temperatures.
Can flash panels be used outdoors?
Yes, flash panels are suitable for both indoor and outdoor use. They are weather-resistant and can withstand exposure to the elements.
What are the applications of flash panels?
Flash panels are versatile and can be used in a variety of applications. They are commonly used in signage, displays, and exhibitions. They can also be used in interior design, for wall coverings, ceilings, and partitions.
What are the benefits of using flash panels?
Flash panels offer several benefits. They are lightweight, easy to install, and customizable. They are also durable, energy-efficient, and low maintenance. Additionally, they can enhance the aesthetic appeal of a space.
Where can I purchase flash panels?
Flash panels can be purchased from a variety of sources. Many manufacturers and distributors offer them online. You can also find them at home improvement stores or specialty retailers. It’s important to compare prices and reviews before making a purchase.
 Steve Grosvenor
Steven is cofounder of phireworx.com, a Fireworks resource site, and contributing author of Fireworks MX Magic (New Riders), Special Edition Using Fireworks MX (Que), and Fireworks MX Fundamentals (New Riders). Steve wrote SitePoint's The Flash Anthology: Cool Effects & Practical ActionScript